These are some of the more common issues we get emails and calls about.
Most of these issues can be solved by the user, for little or no money and using
a logical 'process of elimination'.
This is not meant to substitute as instructions,
advice, nor in any way, training for anyone not already correctly and
competently qualified in electronics repair / restoration for issues / repairs
that require proper training or a qualified electronics technician.
When
in doubt, DON'T do it yourself and consult a
professional.
Quick
Jump to specific types of gear (but some problems presenting in one
unit, may be due to an issue somewhere else in your system):
Stereo Receiver / Integrated Amplifier / Separate Pre-Amp & Power Amp
Audio System Q&A
Speaker issues Q&A
AM/FM Tuner Issues Q&A
Tape deck / player / recorder (cassette, reel to
reel, 8-track) Q&A
Turntable /
Record player / Phonograph issues Q&A
Misc Hints / Issues
Stereo
Receiver / Integrated Amplifier / Pre-Amplifier / Audio-System Q&A:
Issue:
My Stereo Receiver / amplifier
/ system will not power up or 'turn-on'...
A:
Assuming you've done the obvious of making sure you
have a 'good' (hot) AC outlet to connect to, and you've paid your
utility bill, there's not much that falls into the realm of 'user
serviceable' solutions. Of course there could be an 'externally located'
AC / Mains fuse on the rear of the unit. Easy enough to check (make sure
that the unit is disconnected from AC power prior to removing the fuse
cap). More likely there are 'internally located' AC / Mains fuses, along
with others. That becomes a bit more involved to locate and change, and
may not fall within the 'skill set' of many users. Beyond 'fuses'
there's not much you can do, except find a service facility that would be
willing to take a look. The potential 'good news' with a 'totally
dead unit' issue (barring catastrophic transformer issues) is that the
problem is commonly easy to rectify (relatively speaking).
Issue: The sound on my Stereo Receiver / amplifier cuts out at any
volume and on any source...
A: The most
common cause of sound intermittently cutting out on one or both sides of
a receiver / amplifier is a dirty 'Tape Monitor' switch(es)
followed next by a dirty / corroded 'Input Selector' switch.
To troubleshoot, individually manipulate each ‘Tape Monitor’ switch
rapidly, numerous times, while monitoring the sound until you find the switch
that affects / improves the performance. If that affects it, then the
switch needs to be cleaned or ultimately replaced if cleaning does not
fix it sufficiently. If the ‘tape monitor’ switches have no effect, then
examine the ‘input / source’ selector with the same procedures. If still
no effect, then start touching / manipulating the rotary controls such
as Volume, Balance / Tone etc, Loudness, Audio-Mute, Stereo / Mono
switch etc. Also check the ‘source’ connector cables (RCA) for
connection integrity / quality.
If the sound tends to cut out only at lower volumes, then it is
likely corroded contacts in the ‘Speaker Selector’ switches.
This can usually be deduced by carefully manipulating the speaker
selector(s) while listening at a lower volume. If the sound tries to
come back while pushing / turning / flipping the speaker switches, then
that is the likely culprit. Cleaning a 'speaker
selector' switch with a liquid agent might address it, but it
usually requires a more aggressive method such as disassembly of the
switch to allow ‘burnishing’ of the internal contacts. They have likely
been ‘arcing’ due to the higher current that passes through the speaker
selector switches and liquid cleaners will not fix that. If the arcing
has severely ‘pitted’ the contacts, the switch may need to be replaced.
Issue:
Volume, Balance, Tone controls have static when turned or moved
on my Stereo System...
A; This is one
of the most common issues with any unit over about 5 years, old and
certainly most any unit that would be considered ‘vintage’. The problem
is usually solved by a thorough cleaning (by someone qualified) with an
appropriate cleaning agent such as GC Electronics-De-Ox-Id, Caig DeoxIT
D5 or G5, De-Oxit, Chemtronics, MG Chemicals 'Electrosolve' Contact
Cleaner, TechSpray contact cleaners / tuner cleaner spray, or similar
(beware of the ‘super cold’ cleaners on some of the older internal
plastic / nylon components, as they can be ‘shattered’.
Also, some cleaners / solvents can 'melt' plastic parts or react with
plastic internal and cosmetic parts). All the controls and (and
switches as possible) should be cleaned at the same time while a tech is
in there. If after repeated cleaning the problem persists or it only
works for a limited time after a proper cleaning, then ultimately the
control / switch may need to be replaced. PS. I have folks tell me all
the time that they “removed the knobs and squirted some of that cleaner
back in there and it didn’t help at all”. That would be akin to opening
your fuel tank door on your car, pointing the nozzle at the gas cap and
pulling the trigger. Unless you remove the cap and actually ‘insert’ the
nozzle, nothing gets in. Unless you go into a control potentiometer
(sometimes erroneously referred to as a 'rheostat',
which is a different kind of 'attenuation' control, usually used for
larger amounts of current, than a 'variable resistor / potentiometer')or
switch from ‘typically’ rear-located access ports
 and flood the control internally, no
cleaner gets to where it should.
and flood the control internally, no
cleaner gets to where it should.
.JPG)
.JPG)
A note about sourcing replacement switches, pots / potentiometers
/ controls for vintage stereo / audio gear.
Most parts are
'fairly' to VERY specific
not only to a particular brand, but specific down to a ‘handful’ of
models and sometimes unique to ONLY ONE MODEL. There are many parameters
to finding a replacement part, especially potentiometers. Besides the
resistive value, there’s ‘taper’ as in ‘Audio taper’ or ‘linear taper’,
some potentiometers such as ‘balance’
pots have a ‘center detent’ / notch, some
are double stacked, some are quad
stacked, the legs / terminals usually
need to be of the same dimensions (although you may
be able to 'scab' on leads), the
metal ‘body’ may need to be of a particular dimension (some are large
and some are small(er), the mounting
thread diameter and length are likely critical, the
shaft length, shape and design are almost ALWAYS critical,
there may be an unusual current value
assigned to it, it may have multiple
‘jobs’ and have other terminals on top etc.
Bottom line is, you probably ‘ain’t gonna go to Radio Shack and
pick one up’. In fact probably the only
place you’re going to find a suitable replacement is from a salvage /
donor unit of the same model, or at least a model
that uses the SAME parts (unless you don’t care about the originality of the unit,
exact performance, exact look etc, but then hey, you could probably make
something out of a bit of old carpet lint,
a little spit and some duct tape’ work,
right?....). Potential sources for
parts you could ‘make fit’ might be:
www.oaktreevintage.com/Stereo_Parts_Salvage_Units.htm ,
www.dalbani.com
, www.digikey.com
,
www.newark.com , www.partsexpress.com
,
www.studiosoundelectronics.com ,
www.tedss.com ,
www.tubesandmore.com (revised 2025)
If you have a parts source to suggest, or 'are' a source for potential
parts, let us know and we'll consider adding the info.
Issue:
When I ‘touch’ the: ‘Volume’, ‘Balance’, ‘Bass’, ‘Treble’, (etc)
controls the sound cuts out. I don’t even have to turn them. Actually
they sound fine when I turn them, only when I ‘push’ / ‘pull’ / ‘touch’
/ 'jiggle' them does the sound cut out...
A: That is a
less common issue and if we rule out ‘dirt’ or corrosion,
then the next likely suspect would be bad solder joints or ‘cold’
solder joints. Re-flowing the solder joints by someone qualified usually
is the fix.
Issue:
The sound on my stereo cuts out, but
only at ‘higher’ volumes...
A: If everything
is generally OK at lower volumes (say below 8:30AM or
9:00AM, if you imagine a
'clock face' on the stereo
units' volume control), and you’ve ruled out the above issues, then
consider some of the following possibilities as
potential causes;
-A single strand of speaker wire just ‘touching’ a neighboring strand
can allow an amplifier to function, but likely at an elevated
temperature, which will reduce it’s ability to perform at elevated
volumes. Since ‘higher’ volumes means higher temperatures, any
unnecessary increase reduces the amount of ‘leeway’ an amp has to do
it’s job. The amplifier will run hotter than it
typically should.
Solution;
Inspect and rectify speaker wire connections.
- Too many speakers connected to the output of an amplifier resulting in
too low of an impedance load on the outputs, or speakers with an
impedance lower than the amplifier is designed to handle, or a
combination of the two. The amplifier again, will run
hotter than it typically should.
Solution;
Reduce the load on the amplifier, either by choosing speakers of a
‘higher’ impedance rating, eliminating speakers,
re-wiring to a 'series' or 'series-parallel' combination or a
combination of solutions. You may need to consult ‘Ohms Law’
to determine correct combination.
- Output transistors that are not cooling sufficiently, usually due to a
build up of dust / grime on the output transistors, heat sinks and other
cooling apparatus. I have seen many units with layers of ‘build-up’ on
the internals, especially from units used in or around kitchens,
industrial areas, shops, garages etc. This grime acts as an insulating
blanket, trapping heat and reducing free air flow to parts.
Heat is the primary ‘killer’ of electronics, and anything you can
do to reduce it will likely lengthen the lifespan of a unit and reduce a
performance robbing issue.
Solution;
Have the unit properly cleaned internally by someone
qualified. Hopefully irreversible damage has not been done.
- Weak output transistors, or transistors that are ‘on their way out’,
or have a bad solder joint somewhere in the signal / power output path.
Solution; This
problem would need to be addressed by a qualified electronics
technician.
- Simply a speaker load
that is too large for the volume you are trying to achieve
(similar issue addressed above).
Solution;
Either use less speakers, or higher impedance speakers, or a combination
of the two, or get a larger, more ‘sufficient for the task’ amplifier /
receiver
- 'Compromised' / 'Cold' / bad solder joint /
connection somewhere in the signal chain that only gets connection when
there is enough current to 'arc' across the gap in the joint /
connection.
Solution;
Find the errant joint / connection and re-flow the solder joint (and
inspect and re-flow any other 'questionable looking' ones) or improve /
fix the connection. (This can be easy and
quick, frustrating and time consuming or anything in between and sometimes
seemingly impossible to find or locate)
There can be a myriad of other
possible reasons for the ‘high volume / cutting
out’ issue, but the above are the most common we’ve seen.
Issue:
I was playing 'fairly loud' (70% OR MORE, of the way up the
volume control) with 4 speakers (or one pair of 4 Ohm speakers) and my
receiver / amplifier 'smoked' / blew up!...
A:
Well, 'the horse is out of the barn' now, but YOU CAN'T DO THAT!!! 75%
of the way up on a volume control (about 3:00 O'Clock) is WAY TOO MUCH.
Generally, the only thing past about 1:00 and certainly 1:30 is 'clipping' and extra heat.
PLUS you were playing the maximum load at 4 Ohms (or maybe less). 98% of
amplifiers (receivers) can't do that, at least not for very long.
To use an analogy, you were driving with your tach past 'red
line'.....and you were pulling a trailer (that's at the top weight of
what your vehicle is rated for)....and you were trying to
maintain 75 MPH....and you were going 'up hill'. You
generally CAN'T
DO THAT, at least not for very long. Period! (well,
actually, I can as I have a 'Duramax diesel' (except for the "red line"
part)).
Solution;
Again, the 'horse is already out of the barn, but in
the future, reduce the load on the amplifier, either by choosing speakers of a
‘higher’ impedance rating, eliminating speakers,
re-wiring to a 'series' or 'series-parallel' combination, purchase
additional amplifiers suitable to your needs or a
combination of solutions. You may need to consult ‘Ohms Law’
to determine correct combination.
Issue:
The sound on my stereo cuts
out when the wires in the back are jiggled or moved.
A: Then don’t
move the wires! Just kidding.
You either likely have bad RCA cables
(prevalent on cheap cables / connectors
the system is most likely connected with) or the solder joints on the jacks /
connectors are bad or ‘cold'. Methodically moving the
cables around will often find which cable / connector is the culprit.
Replacing the cables (preferably by
somewhat higher quality versions this time) or re-flowing the solder
joints by someone qualified usually is the correct fix. Occasionally the
RCA jacks or plugs can become oxidized enough to cause this. A ‘quick
fix’ is to repeatedly ‘rotate’ the plug to scrape off the oxidation and
expose clean metal can 'fix' the issue.
Issue: My Receiver / Amplifier only plays very low
sound and the sound is very distorted. I’ve tried the above / previously
mentioned solutions to no avail.
A: Low and
distorted sound on one or both channels of a stereo receiver / amplifier
that never improves or recovers by any of the above means, likely means
that your receiver / amplifier has bad outputs (output transistors)
and you are simply hearing the sound from the 'pre-drivers' passing
through.
 These types of situations require a
qualified electronics technician and correct
replacement parts.
These types of situations require a
qualified electronics technician and correct
replacement parts.
Issue:
I get no sound at all from amp / receiver, but it ‘powers on’ (I’ve
gone through the above check list already).
A: There is a
myriad of possible problems / solutions. First would be ‘operator error’
issues such as;
1)
Are the speaker
selectors set correctly?,
2) Are the speakers
‘known to be working’ and connected
correctly?
3) Do you have a
‘good’ signal source, ie; CD player (usually
most reliable), next would be a good FM signal?
4) Is the balance of
the switches / controls set correctly (a common one is that a ‘tape
monitor’ switch is left engaged)?.
Next would be to
check ‘non-operator’ error issues such as:
1) Most 'later model' (from
mid 1970's on) stereo receivers / amplifiers have ‘speaker turn-on’
relays to protect against DC surge to your speakers from an amplifier
'powering up'. If yours has that, then you likely normally hear a faint
‘click’ a few seconds after powering the unit on. If you no longer hear
that, then that tells you there is a technical problem either with the
amp, the speakers or the connection of the speakers (no the relay is not usually the issue, but if all else ‘checks out’
then bad / corroded / arcing relay contacts can be a cause).
2) Next, some of the
higher quality / better models may have a ‘pre-amp’ OUT / ‘main / power
amp’ IN loop. On a few models these ‘default’ to a ‘working state’ even
if nothing is connected, but most will require ‘shorting plugs’ /
‘shorting jumpers’ to be connected. These are ‘U’ shaped, thick, solid
wires and if you don’t have the originals, they may be difficult to
source. A workable substitution is a pair of RCA cables.
Some units used a slide switch to make this connection, and it could
have corrosion blocking the signal (would have to be heavy corrosion
and not likely be effecting both channels).
3) Next would be to
check any fuses. Some receivers / amplifiers have speaker protection
fuses that may be located on the back of the unit that the ‘user’ can
inspect / replace. Most that have fuses, however, have them located
inside the unit. Those should likely only be inspected by someone
properly qualified.
Beyond the above
mentioned issues, most anything else is likely going to require a
qualified technician to deduce and is beyond the scope of what we can
advise on.
Issue:
My stereo receiver / amp ‘sizzles’ or makes a sound like bacon
frying, and / or the dial lights dim periodically when on.
A: We see this
periodically, and more typically on lower end
stereo units. It is commonly
a sign of the 'Power switch'
arc'-ing. This is common on receivers such as the Pioneer SX-450, SX-550,
and some Kenwood stereo receiver such as the
Kenwood KR-5030, KR-6030 &
KR-6050. They use a type of power switch that is conducive to
this issue after 25+ years. Remedy, replace
the power switch or sometimes a ‘second’ set of terminals may be
available on the switch that are not being currently used. We have not found
a source for this switch other than 'take-outs' from salvage units and
we're almost always sold out of them (or more likely have used them for
ourselves) (revised 2018).
An alternative email we received; I have a older pioneer stereo
reciver sx- 9800 (SIC?) with 25watt. will de-oxit spray [contact spray cleaner]
get (SIC) sound louder? It flickers when I put on-off switch to power. .
how hard is it to replace switch?
A: The 'flicker' symptom you are describing is the power switch 'arcing'
(which you already eluded to). It's probably also accompanied with a
'sizzle / bacon frying' sound. That is not easily repairable except to
replace with another switch (likely from a donor unit of the same
model). Alternatively you could 'shunt' the wires internally to 'ON' and
use an external 'power strip' to power up the unit. It might be possible
to dissect the switch and try and re-burnish the contacts, but that's
usually VERY DIFFICULT at best, if possible at all. Another possible
alternative is if your unit utilizes a version of the switch that has a
'double set' of contacts on the top, that are not being used, you can
invert the switch and you'll have a fresh set of contacts, but only
occasionally do we see this version. (DON'T DO ANYTHING
UNLESS QUALIFIED TO BE INSIDE AN ELECTRICAL UNIT).
Contact cleaner will NOT address 'power switch arc'-ing' ' issues. It
will usually take care of cleaning the contacts and surfaces of 'lower
current' switches and controls such as pots and selector switches.
Issue:
My Realistic STA-2000 / STA-2000D,
STA-2001 / STA-2100D, STA-2300, STA-2500, stereo receiver, and possibly
others of the 'larger Realistic Receivers', will not turn off. The
power switch is 'stuck' in the "ON" position..
A: We have seen this on many of
the larger / 'Big Boy' Realistic STA receivers. Whatever switch they
sourced back then has not fared well 40 years later. We don't have a
replacement for it yet. Most folks 'work around' it by using alternative
methods to 'power it on / off' such as a 'switched outlet strip' or make
a specific switched outlet for it. Once we had one that someone had
'drilled' into the wooden side panel, and installed a 'hardware store'
switch. I didn't like that as it now had a hole in the original
wooden side panel. Other then their 'power switch', large,
Realistic receivers are generally FABULOUS performers all around. I have
no other complaints about them.
Issue:
The 'tone controls', ie; Bass, Mid and / or Treble
do not make any difference when turned...
A;
There's usually only one explanation I can think of
for that an that would be that the unit features a 'Tone Defeat' / 'Tone
On / Off' / 'CD Direct' or similar function that bypasses the tone
control circuit. This feature is usually only found on upper-mid to
upper end models. When in the 'Tone Off' or 'Tone Defeat' position, the
tone controls will have no effect on the sound.
Issue:
I can
hear the radio / CD, etc. 'bleeding' over onto other inputs such as AUX,
TAPE, CD etc.
A:
It is fairly normal to hear one source bleed over
into another if the 'currently monitored' source is silent or near
silent, and there is a strong enough signal / program material on
another source currently. You could call this 'cross-talk'. CD's playing on a player, but not being
monitored are the 'worst offender' for this issue. CD's have such a high
potential dynamic range that it is difficult to filter out all of their
sound. One thing that will help is to keep unused inputs capped off with
'shorting' plugs. These are RCA plugs that have their hot and gnd
connected. Generally when a source is connected to an input that takes
care of that (at least to a sufficient degree). Secondly, the 'bleed'
signal is usually low enough, and the 'currently monitored' source is
strong enough to override.
Just FYI. Some units actually came new with 'shorting plugs' inserted
into most of the RCA inputs. Most units with 'Dual Phono' inputs will
have at least one set of shorting plugs, as there is usually a 'phono
pre-amp' located behind them that will 'readily amplify' even the
smallest of noise that might be floating around. Yamaha is one brand
that comes to mind that typically included shorting plugs
occupying most of RCA jacks on their higher end pre-amps 'out of the
package'.
Another possible reason for this is that you have
inadvertently connected the 'offending source unit' into 'Record Out' on
one of the tape monitors, instead of 'Play(back) In'. Simply reconnect
it to 'Play In' or 'Playback In' (or similar label) and that should
solve the issue.
Issue:
At
higher volumes, my sound, especially the bass, seems to distort,
especially the bass and / or I get a 'sharp pop or snap' from my
speakers...
A: All receivers
/ amplifiers have a limit to the power / volume they can safely produce.
Most are going to 'red line' at approx 1:00 or 1:30 PM (looking at a
'rotary' volume control as a clock face) on the volume knob. Generally
much past that does not result in any more power or actual volume, but
simply an increase in distortion or amplifier clipping. I say
"generally", as while there are some exceptions to this rule, they are
VERY rare (Barney Oliver amplifiers and a Kenwood KA-6105 are the only
two that immediately come to mind). Don't increase the volume past 1:00
or 1:30 (again, think of the 'rotary' volume control as a 'clock face',
with 'straight up' being 12:00 Noon or 50% of it's rotation. If your
unit has a 'linear-fader' style volume, then think of it as a percentage
of it's total 'throw', so 55-60% would generally be max). Now there are
many variables that affect those limits such as amplifier design,
build-quality, speaker loads, designs and impedances, but again, the
above 'rules' are generally applicable.
Also, Reduce 'Bass' and any of the lower bands of an EQ, either built-in
or external EQ, proportionally as volume is increased past 10:00 AM.
Discontinue utilizing 'Loudness' control past approx 10:00 AM on volume
control.
I've heard many people ask, "well why does my volume control go to 'ten'
or all the way if I can't turn it all the way up? Well, it just does.
Your accelerator goes all the way to the floor, your tachometer goes to
8 or 10k and your speed-o-meter probably goes to 120 or 130 MPH, but you
don't generally want to go driving around that way for a lot of reasons.
The same basic principle applies to the volume control and EQ on a
receiver / amplifier.
Issue:
I don't get any sound from the 'B'
speaker output on my Kenwood KR receiver...
A:
While there could be
other reasons, the most common reason for an issue with the 'B' speaker
output on a Kenwood KR receiver, is that you only have speakers
connected to the 'B' outputs. I don't know why, but for some reason
(maybe someone will enlighten me), most Kenwood KR receivers will not
produce output from the 'B' speaker outputs, unless you first have a
load (speakers) connected to the 'A' speaker output. Also, be pay
attention to the speaker output labeling convention when connecting
speakers to Kenwood receivers and amplifiers. While most manufacturers
will arrange speakers 'in pairs' going horizontally (across), Kenwood's
tend to arrange their pairs 'vertically', so if you're accustomed to
connecting speakers 'horizontally' by habit (probably only a habit by
folks like me, who have to do things like that a lot), pay attention, or
you'll connect both speakers to either the A&B 'Left' outputs or 'Right'
outputs. Just FYI.
STEREO SPEAKER ISSUES / PROBLEMS:
Issue:
One of my speakers’ sound cuts out periodically
on one side.
I have already gone through the above / previous check list.
A: First check some of the above symptoms that may involve the receiver
/ amplifier. If related issues already listed above can be eliminated,
then check for fraying speaker wire, connection integrity of your sources
and speakers, inspect speaker input panel for broken / loose connectors.
If that is all in order, then swap the speakers (left and right) and see
if the issue ‘follows’ the speaker, or stays on the same side (to
isolate the issue to the amp or speaker). If it follows the speaker,
then you may need to further check the connection at the speaker or
internally inspect the speaker.
Issue:
One of my woofers sound cuts out periodically
on one side. (I have already gone through the above / previous check list.)
A: This issue may be from a speakers ‘spider’ wires that are going bad
from too much flexion over the years. To deduce the problem, you can
GENTLY manipulate the spider wires while sending a signal to the woofer.
Sometimes you can ‘re-solder’ a bad section or shorten it a BIT if the
bad part is near the speaker connection terminals, but replacement of
the flexible spider wire is the best solution. If it’s broken /
intermittent in one spot, it’s probably getting ready to ‘get tired’ in
other spots. This may or may not be within a users ‘skill set’ (meaning
it ain’t necessarily easy to do). If you don’t know what the ‘spider
wires’ are in the first place, you probably need to send the woofer out
to a professional for repair or if the original driver (speaker) cannot
be repaired or sourced then a suitable replacement may be in order.
(revised 2018)
Issue:
One of my woofers is 'frozen' / doesn't move even if I attempt to
manipulate it by hand.
A: While this can be due to a few reasons, the most common is that the
voice coil was 'heated' beyond it's capacity and 'deformed' / swelled to
the point that it 'filled' the VC gap, thus restricting movement. This
is usually caused either by simply too much power / brute force from the
power amplifier / power source that was beyond what the speaker was
designed to handle. In reality, this does not happen very often relative
to other speaker / driver issues. Another reason, that actually is more
common, is from an amplifier / amp / receiver's amp that is now sending
out DC or is DC'ing. This is caused typically by 'shorted' outputs that
are simply passing DC Voltage, at a fairly high level, ie, 40-70 or more
volts. This would also mean that any 'DC Protection' that is normally
built into most quality amps (since the mid 70's) did not do it's job.
This usually occurs at 'turn-on'. You will simply hear or 'sense' a low
frequency 'thunk' or see the woofer move out or in....once. After a very
short time, the voice coil simply turns into a 'space heater', bubbles
up the lacquer on the copper coil, shorts further and expands / burns up
in the gap, then either blow a fuse in the amplifier, burn-thru at the
voice coil, thus terminating the connection, burn thru at the spider
wire, or if it continues, actually catch on fire. This will require a
're-cone' as well as determining why the amp is 'DC'ing'. DO NOT USE
THAT AMPLIFIER UNTIL IT HAS BEEN REBUILT / OVERHAULED. In that state,
the amp / receiver WILL continue to destroy woofers / low frequency
drivers (damage from DC is usually limited to the lowest
frequency driver, as the drivers that handle frequencies above the
woofers are typically protected by capacitors in the crossover network
which will block DC from the balance of the drivers such as mids and
tweeters).
There is another reason we see for a 'locked-up'
/ 'frozen' woofer / driver voice coil. 'Magnet Shift'. On about 50% of the 'Polk Audio'
speakers that come thru the shop, we will expect about 50% (at least) of
their woofers to be 'locked-up'. This is due to 'magnet shift'. They are
very susceptible to shock / vibration. Even going down stairs on a
2-Wheel dolly, WITH pneumatic wheels can be enough of a jolt to cause
it. I've had 'vintage' Polk Audio woofers 'shift' while holding them in
the palm of my hand.
Another time I saw it was in a Klipsch Subwoofer that was
dropped off the edge of a stage, which caused the magnet locating pins
to sheer, it's epoxy to give way and then to lock up the voice coil. Not
much you can do in that situation, except higher professional
roadies....
Issue: The higher frequency parts of my sound on one
of my speakers cuts out periodically or my tweeters do not seem to be
working (Mids and tweeters cutting out intermittently).
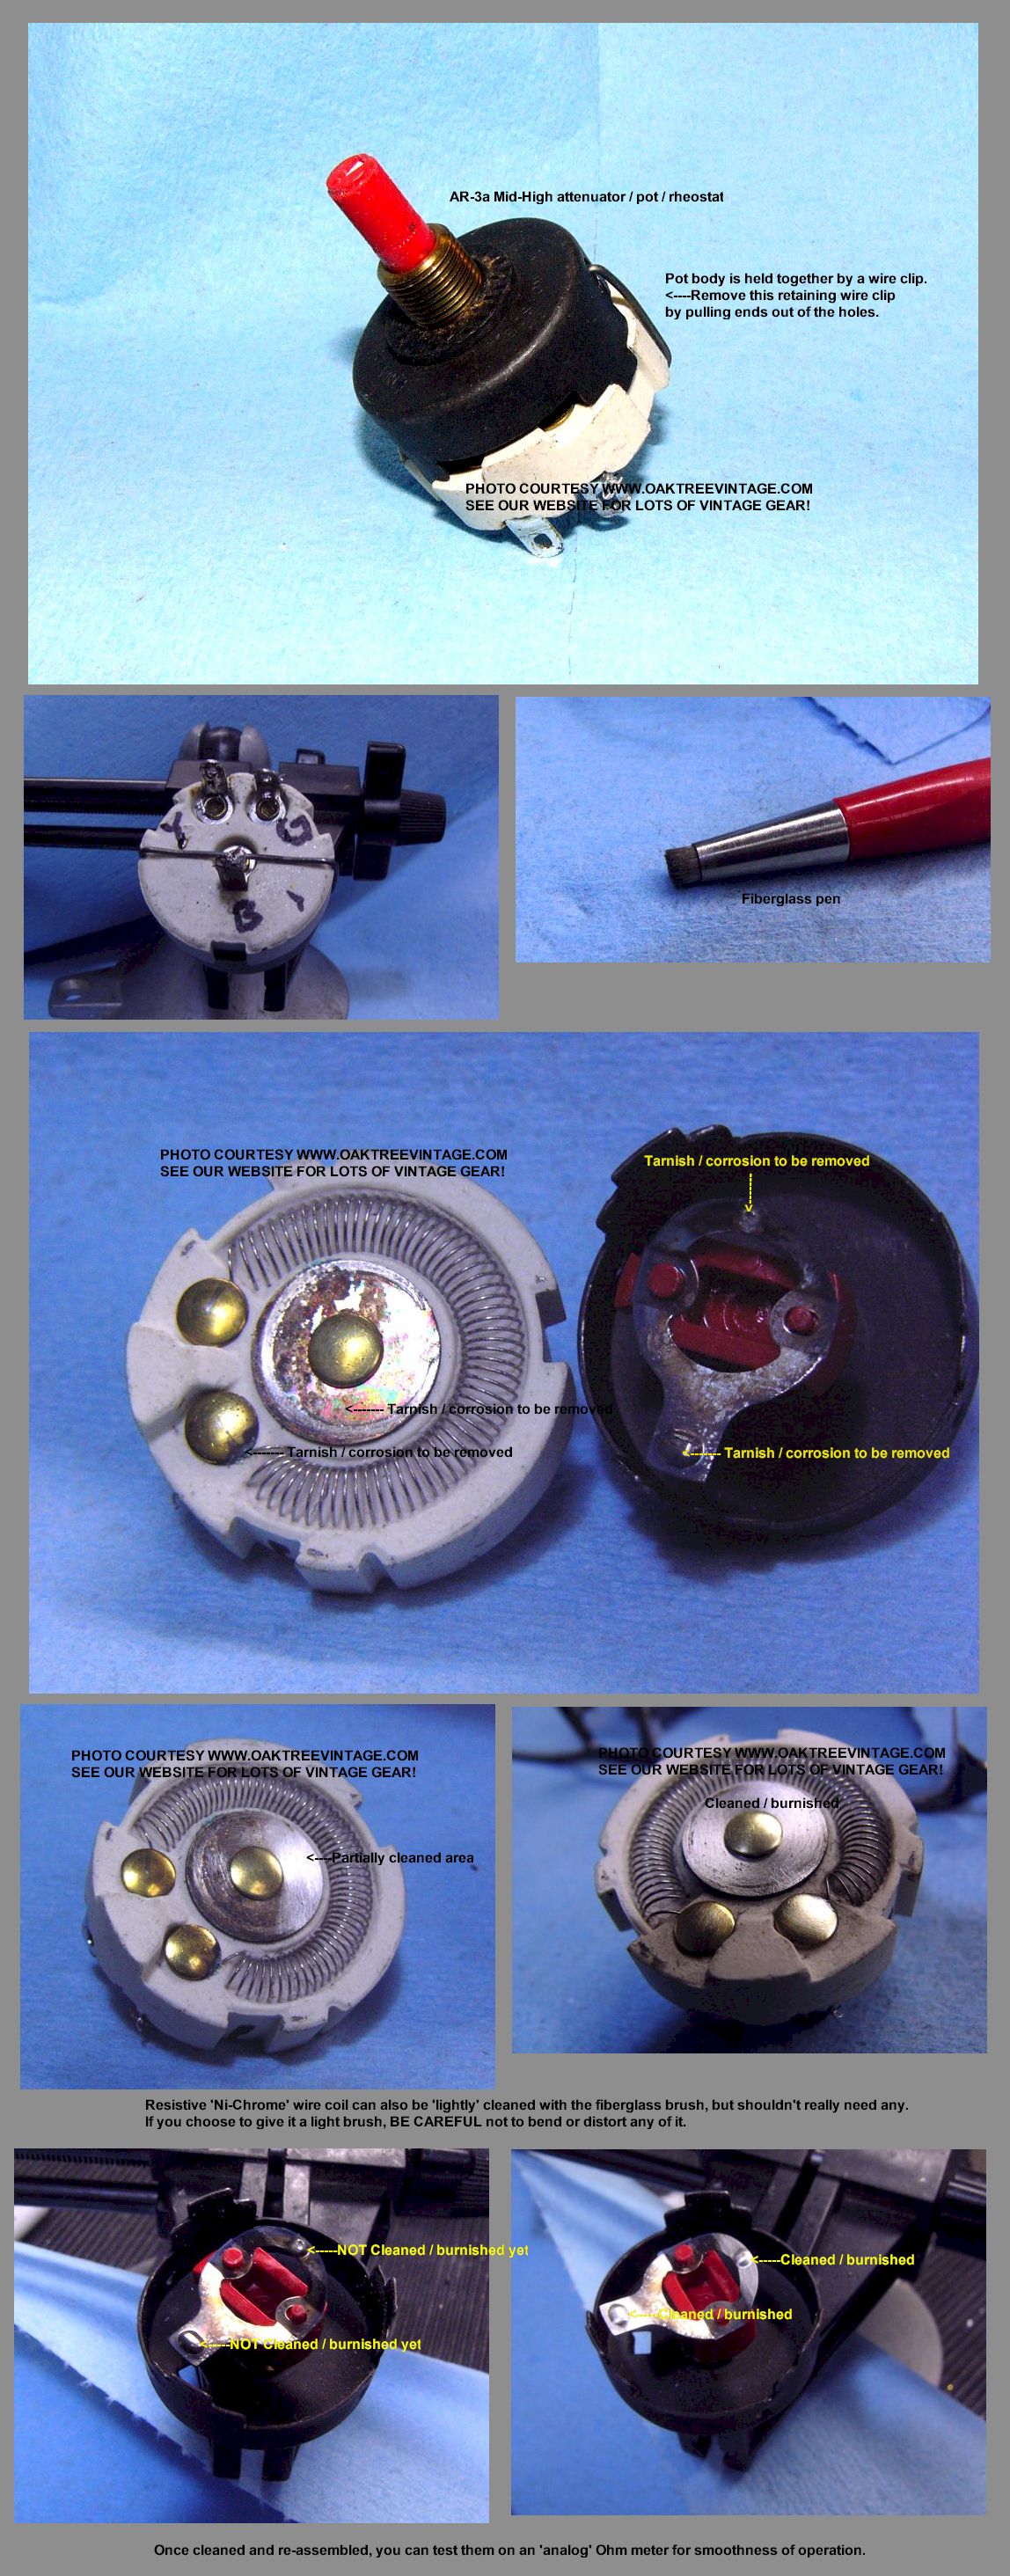
A: Many speakers have ‘Attenuators’ to tailor the ‘top-end’ frequencies.
These are a common source of issue on speakers over 20 years old.
Manipulate attenuators rapidly back and forth on each speaker cabinet
(one at a time), while monitoring a signal (preferably ‘white noise’)
and see if the 'quiet' drivers start working (even if intermittently). The
attenuator contacts oxidize / arc and will need to be cleaned**. Once cleaned
and / or ‘re-sprung’ (sometimes a painstaking process) they should
perform correctly.
If that was not the source of the
issue, check any speaker fuses or reset breakers. If still no resolve,
then you may need to remove the drivers (midranges / tweeters etc, and
inspect / test independently and individually).
** "cleaning" 'higher-current' contacts
such as "attenuators", "Power switches", "Speaker switches" etc.
typically are going to require more than just 'spraying with some
contact cleaner'. Their 'intermittent' issue is not likely due to the
same causes that afflict 'potentiometers' such as dust, smoke, tarnish
etc, but a carbon build-up due to the 'arching' action of higher,
'speaker level' currents. That will usually require more 'invasive and
physical'
intervention such as sandpaper, emery board, burnishing strips etc.
Think 800-1500 or higher grit. Each potential contact combination will need to be
addressed. Care should be taken not to 'spring' any of the contact
fingers.
Having said
all of that, it’s not typically the coil
windings of the 'track' that are the
issue. It’s usually the brass or silver plated track in the bottom of
the cup / housing that the center / "wiper"
terminal rides on (at least in most). That will need to be physically
burnished. We use a fiberglass pen. Most
L-pads / rheostats etc were not meant to be disassembled, so there’s
that additional hurdle as well.
Also, doing this may remove an original, protective plating
meant originally to prevent the effects of arching, but as 'new /
replacements' aren't often available, it falls under the heading, "what
have you got to loose". Ultimately, speaker "attenuators" can be
bypassed or removed from the circuit if need be (which in my opinion, is
almost always the BEST option by far).
A note on how to ‘quick test’ speakers / drivers (driver means;
woofers, midranges, tweeters, super tweeters etc.). Most folks will play
a CD or similar source to test their speakers. This is not a very
accurate, or even useful way to deduce speaker condition due to a
particular ‘cut’ or music selection may not necessarily have the
frequencies you need, strong enough to excite particular drivers at the
time you are trying to test (hear) them. This is especially important on
drivers such as ‘Super Tweeters’ or ‘Subwoofers’ (actually subwoofers
are fairly ‘rare’ in REAL and traditional ‘2-channel’, home audio
systems). Super Tweeters commonly do not excite until 12-15kHz and
there’s typically not much going on up there in most music. ‘Subs’ do
not typically become active until below 120Hz or hopefully lower and
there’s sometimes nothing in a mix at those frequencies as well.
The best way to test speakers / drivers for basic function is to use an
FM tuner, with the FM muting turned 'off'. Tune the FM radio / tuner to
one of the extremes of the dial (lower / left end is better) to a point
where you get nice, clean, steady ‘hiss’. That is essentially ‘white
noise’ and a close proximity to ‘pink noise’ which is a close
representation to all frequencies being played at once (there’s other
parameters to ‘pink noise’, but unimportant for the above test. Also,
keep in mind that your FM tuner likely has a steep filter at 15kHz as
that's the FCC cutoff limit).
See what differences (if any) you have
between the two speakers. Turn the attenuator knobs between their
3 positions and see if the drivers are
intermittent, or the changes seem 'errant'.
Each should reduce the tweeter volume or the midrange volume
slightly. Likely what will happen is that as soon as you try and
move a knob, drivers will cut out. This is a
sign that the attenuator contacts
need to be cleaned
(likely meaning burnished, which is not
typically an 'easy' task) (and the
contacts should be intermittent at this point).
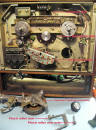
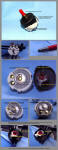 AR-3a Mid-High Attenuator being cleaned / restored.
Here's a request that came in recently:
Question: "CV-3000
replacement crossovers. Are there any available or optional versions
available for use. I love my old Cerwin Vega speakers but the rheostats
for the midrange speakers are giving me trouble. I have tried using the
product detoxit but so far no success. Can you possibly help me out with
this issue please. Thanks"
Our Response: “Hi , Thanks for visiting oaktreevintage.com .
That would be expected with ANY speaker designed with “L-Pads /
Attenuators”. The vast majority of owners, simply leave them turned up
all the way, which is the same as them NOT being in the circuit. If that
is the case with you, and you don’t need them, I would just ‘jumper’
across them (fairly easy to figure out for most circuits with some web
research). When we do ‘permanent installs’ in retail shops, bars,
breweries, restaurants, etc. with ‘vintage’ speakers, we bypass all the
attenuators (along with a few other modifications to
the speakers for a commercial installation). They are a common
failure point over time with almost 100% probability.
Even if I did have them available, mine would need to be cleaned
as well. If you’re ‘dead set’ on cleaning
them, it’s not typically the coil windings
of the 'track' that are the issue. It’s
usually the brass or silver plated track in the bottom of the cup /
housing that the center / "wiper" terminal
rides on (at least in most). That will need to be physically burnished.
We use a fiberglass pen. Most L-pads / rheostats etc were not
meant to be disassembled, so there’s that additional
hurdle as well. Hope all that helps. Good luck & Thanks again,
Jerry at www.oaktreevintage.com
"
Another email:
“I have inherited some nice
speakers (Sansui SP-2500X). all I see is
scratchy switches in each one.....they seem
very hard to access. do you have any recommendations as to how to access
the switches?...I am in Toronto…would love to get in there with some
good contact cleaner! its a tough fit”
Our Response: "Hi Bob,
Thanks for visiting oaktreevintage.com. So, attenuators are almost
always going to be causing issues / intermittencies at this point. They
need more than what any “Contact Cleaner” can do. You can try spraying
the wafers / contacts with cleaner and then racking them back and forth
a couple dozen times. Might fix the issue for a while, but typically
temporary. The best attenuators are “NO” attenuators, ie; bypass them
with jumpers. If, however, you really want to keep them intact, the only
way we’ve really found to address them is to burnish the contacts (very
carefully to avoid bending / distorting) with very fine wet/dry sand
paper (in the 600-1200grit range). We actually have that, plus burnish
sticks, plus fiberglass pens that we use (I don’t think the “X” version
of the “2500’s” will allow the use of a fiberglass pen). Hope that all
helps. Good luck and thanks again, Jerry at www.oaktreevintage.com"
Issue:
I have 'Super Tweeters' on my speakers, but it doesn't seem like
they're working.
A: Some speakers
have tweeters that are designed to reproduce frequencies in the
uppermost range of human hearing (and beyond). These are typically
referred to as "Super Tweeters", and are usually relatively small. While
most 'standard' Tweeters might be crossed over with a 'low end' cut-off
of 6kHz, 8k, 10k or 12kHz, 'Super Tweeters' usually don't start to be
excited until frequencies reach at least 12kHz, but more often 15kHz.
There are a number of possible reasons why someone might think their
super tweeters are not working. The first is, "there's not a lot
going on in most music" in that frequency range, and even if there is,
it might not be at a time you are listening, nor of sufficient amplitude
(volume) or duration enough for you to make a quality judgment call as
to their true condition. Secondly, they probably are in 'close
proximity' with other tweeters, and will likely be too 'overpowered' to
hear to any practical degree. Thirdly, and no offense, your ears
may not be sensitive to frequencies in those upper registers anymore (or
ever).
So the most practical way we've found to test
super tweeters is with 'white noise'. White noise is a fairly
representative mix of the 'human hearing range' at ALL times, and at
somewhat equal amplitude (not as good as 'Pink Noise' for audio testing,
but unless you have a 'Pink Noise' generator hanging around (and I'm
going to guess you don't)), you probably do have a way to generate
'White Noise'. If you have an FM tuner (analog type is best, but
some digitals might also suffice), with a way to disengage the "FM
Muting" (and most 'analog' types do), then simply turn off the FM
Muting, so that you get 'hiss' in between stations (this is akin to
'Squelch' on a CB, if any of you are old enough to make that
connection). We are looking for the most 'pure / clean
hiss', with no program material (the 'lower / left' end of the scale is
the best place to find a section of 'pure hiss'). This is White
Noise. Now, balance your speakers either to the left or right.
Turn the 'Loudness' Off and the 'Bass' (and 'Midrange' if you have it)
all the way counter-clock wise. Turn the Treble control all the
way 'up' (clockwise). You shouldn't need the volume very high for
this test, and don't turn it very high, as if you need to test for an
extended period of time, you'll likely 'desensitize' your ears too much
for any accuracy, and you risk damage to your hearing as we're going to
have our ear VERY close to the individual drivers (call them speakers if
you must). At this point you may or may not hear anything.
You're not going to likely get a lot of 'volume' from the super tweeter
for another reason, and that is that the FCC limits FM broadcasts to
about 15kHz on the top end, so if your crossover is set at 15k, then the
tweeter will just barely be getting much signal, but in the end it will
be sufficient to determine of they function. At this point you may
not be hearing anything. You could have a dirty attenuator (see
previous section) which could be affecting the signal flow to the super
tweeter. Ruling out a dirty attenuator, you may need to dismount
the super tweeter(s) and if their leads are long enough, pull them out
from the cabinet, away from the other tweeters / drivers enough to
determine if they're working. Commonly, that will still not be
sufficient enough isolation to make an accurate determination, and you
will need to completely remove them from the cabinet. At this
point you could make / rig some extra wire to allow you to move the
super tweeters completely away from the cabinet. Here at our shop,
we skip that step, and remove the super tweeter completely and test it
independently. To do this, we connect it directly to the output of
our receiver / amplifier. CAUTION: If you are going to do
this test, you must be VERY careful, as terminal damage to the super
tweeter can result if you aren't careful (yes you could connect the
correct 'filter cap' in series with the tweeter to protect it, but if
you can do that, you probably don't need to be reading this paragraph on
"how to test a super tweeter"). We connect a 'control speaker'
(can be any speaker, but the speaker you removed the super tweeter from
is sufficient) to one side of the amplifier (make sure that the
disconnected leads from the super tweeter are isolated from one
another). To the other side, we connect the 'super tweeter' to be
tested using a length of speaker wire and / or 'alligator clip' / test
leads. We balance COMPLETELY the pre-amp over to the 'control
speaker' prior to powering up the amp / receiver on. We then do
the above mention 'White Noise' procedure. At this point you
should hear fairly 'thin' white noise coming from the 'control' speaker.
Assuming that, now turn the volume down to a point where you can barely
hear the hiss, then start slowly turning the balance control to the
'super tweeter'. It's a good idea to also keep a hand on the
volume control, to regulate that, insuring that it doesn't get 'too
loud' as super tweeters are generally fairly fragile. We only
looking to detect even the slightest amount of hiss (again, "barely
hearing" anything coming out could be due to the "FCC limits" or hearing
issues on your part). Now, at this point if you don't hear
anything (and we are assuming your amp / receiver is working properly on
both sides and your 'test jig' is correct) either the tweeter has an
issue, or you can't hear it's range (common issue). If 'lack of
hearing range' is a possibility, the recruit some 'other ears'
(preferably 'younger' or 'less stressed' from 'life's hazards') to give
it a listen. There are further possible tests, but the above
should take care of 99%+ of situations.
The above 'White Noise" method is also very handy for
testing your speakers 'overall performance / health' and to determine
correct 'phasing'. Simply adjust the 'tone controls' to their
'defeated' position (if they're 'rotary', that would be the 'straight up
Noon' position), and balance your speakers Left then Right. Any
appreciable difference in sound could indicate you have an issue with
your speaker(s) that need to be investigated (if there is a difference,
left to right, swap sides with the speakers / wires to rule out
potential issues with anything 'upstream'). Your speakers should
sound very similar to one another all the way from the low end / bass to
the upper end treble. If your speakers exhibit more 'bass' volume
while balance hard left or hard right, and sound 'thin' when balanced in
the middle, then you have a phasing issue with the way you have them
connected to your power source.
Issue: While playing my speakers loudly I heard a
‘pop’ or bang or saw / smelled smoke and now my tweeters / midranges do
not work. Now I only get sound from the woofer.
A; You likely blew one of the capacitors on the crossover. If you
inspect the crossover internally, and it looks like a firecracker
exploded on the circuit board, then that is the typical visual evidence.
Hopefully it went prior to the tweeter or midrange going (even if the
driver does still function, the tweeter / mid voice coil may have done
some ‘cooking’ prior to the cap blowing up).
A 'blown' capacitor is typically easily repairable by replacing the
capacitor(s). To get the correct part value, look at the, hopefully
‘good’ crossover board on the other speaker. This would be a good time
to replace ALL of the capacitors on both boards with the highest quality
capacitors you can find. Also it’s a good time to clean any attenuators,
and inspect / re-flow solder joints and inspect / re-secure the heavier
parts such as coils. Also ‘shock mount’ the crossover circuit board to
its mounting and possibly ‘seal’ the input panel. A good source for
replacement / higher quality speaker crossover capacitors is
www.partsexpress.com .
Issue:
At
higher volumes, my sound, especially the bass, seems to distort,
especially the bass and / or I get a 'sharp pop or snap' from my
speakers...
A: (See the answer to these issues
in the above section on receivers and amplifiers.)
Issue: There’s a light Metallic ‘rattle’ or buzz from
one of my speakers, usually detectable at lower lower volumes. (see
next symptom below as well)
A: A ‘light’ / delicate, metallic sounding rattle from a speaker at low
volumes is commonly from the voice coil ‘unwinding’. The only remedy is
to replace or have the driver re-coned. As of this writing, we are
currently refurbishing a pair of Altec, Model Five's that have one of
the woofers with this symptom. We first heard it upon our 3k to 20Hz
audio sweep, but it was also apparent on some music passages, if you
listened carefully enough. Back on the work bench, you could 'tap' on
the cone with your fingers and hear the sound.
Issue: My Speaker is making a distorted sound.
A: A couple of
questions regarding the ‘conditions’ of the sound issues / “distortion”?
Is your amplifier past 11:30 or 12:00 (relative to a 'clock face') on
the volume control?
Is your ‘Loudness’ control off past about 10:30?
Are / is the ‘Bass Control’ potentiometer not advanced past 12:00 / noon
at upper positions on the volume control?
Is the music overly ‘bass heavy’ so that at higher volumes there is
distortion?
More importantly, (and likely) is there a combination of the above
conditions when you hear distortion?
Does the distortion happen a lower volumes as well as upper, only at
upper or only at lower levels?
Is it a ‘tinny’ / high pitch rattle that’s only apparent at lower
volumes?
Is it ‘frequency dependent’? (In other words is it only certain notes /
frequencies)
With only a few exceptions, speakers usually do not ‘make’ sounds.
They ‘reproduce’ them. Most ‘non typical’ sounds will be coming
from somewhere ‘upstream’.
Exceptions are, a ‘farting’ / ‘flapping’ sound from a woofer is commonly
symptomatic of deteriorated foam speaker surrounds (VERY COMMON), or surrounds that
have separated from the cone or speaker frame, or dust caps that have
become separated from the cone, or a torn / ripped speaker cone, or in
some cases the speaker ‘spider’ has become separated from the motor
front plate. Most of those issues can be fixed by the user with a bit of
‘know-how’ or research.
A 'lighter', 'buzzy' sound can be from a speakers ‘spider’ wires touch
the back of the cone. This can commonly be rectified by ‘tweaking’ the
wires a bit so they don’t touch the woofer cone. We have had a few rare
instances where the 'spider wires' are becoming detached from, or
fatigued at their attachment solder points or fatigued somewhere in
between. On those occasions, we've been successful at 're-soldering'
them either at the 'terminal' attachment, and / or at the cone. The
solder point at the 'cone end' is not something that is ever meant to be
serviced, so it's a "last ditch / what have you got to loose" kind of
repair. If it works and holds, then great. (soldering 'spider wires'
involves scraping / scuffing off the lacquer from the braided wires to
get solder to stick and is 'dicey' at best). (we noticed one spider wire
issue, but excess movement of it over the other one, when reproducing
pure sine waves from our function generator. The wire was barely
'hanging on' at the cone end and was being held by one strand, which was
allowing the excess movement. We first noticed 'light distortion' on
piano music, then verified the issue with a function gen).
Other 'vibrations' or rattles can be from loose drivers / mounting
screws / bolts on the woofer mounting flanges, or midrange / tweeter
mounting plates, input plates, crossover components, internal braces,
cabinet joints or due to the lack of felt / rubber feet on the cabinet,
or even loose / stray material finding it's way into the area of the
cone and simply touching or resting on it (think wood splinters
that have worked loose from the cabinet, or grill strings, or insulation
or, or, or....
If you have distortion, snapping, popping or other sounds emanating from
the woofer, then you may need to reduce the volume level, 'Bass' tone
pot, turn off the 'Loudness' control, and / or some combination of those
especially if playing bass heavy music / recorded material.
Some good sources for replacement speaker cones, or replacement foam
surrounds to do it yourself or to have it done would be;
www.midwestspeakerrepair.com ,
www.partsexpress.com ,
www.simplyspeakers.com
(revised 2025)
Issue: Speakers sound 'thin' / lack bass when I select
2 pairs. Each pair sounds fine by themselves, but when I play all four,
I get less bass...
A: There could be a couple of reasons for that. Speakers
can sound 'thin' and lack bass when 'combined' either with another
speaker or another pair. This will be due to 'phasing' or more
correctly, one speaker is 'out of phase' with the other. You can read
else where on the web regarding the technicalities / reasons, but here
are the likely solutions;
1) Check the speaker wires to make sure that all the connections to
'positives' and 'negatives' are correct (especially if speaker wire has
been 'spliced'). If one speaker, or one pair is reversed (accidentally)
the bass response will be much reduced.
2) If the speakers have had work done on them, make sure they are wired
correctly internally,
3) Some speakers are 'reverse polarity' by nature. These may include
some JBL models (especially prior to late 1970's), some early Altecs,
and likely others. If you have a speaker that is 'reverse polarity', the
easiest way to remedy the situation is to simply 'reverse the speaker
wires' at the speaker inputs (you should probably mark the speakers as
'reverse polarity' for future reference).
Following
was from another email I received related to a 'specific' system where a
Pioneer SX-880 was being used with two Gemini 1/3 Oct / 31-band
'Semi-Pro' EQ's.
"Those 1/3 EQs have sounded like tin cans since
the first day I bought them new over 30 years ago. Sad sad sad. oh
well...but I love the Pioneer Receiver!!! It's my best friend. Thanks
again!!!!
So "thin" sounding could be a symptom of a myriad of
causes.
Are the speakers 'functioning' correctly (involves a few simple tests)?
Is the amp / pre-amp in good health? (I can vouch for that one)
Are the speakers connected in 'Phase'? (meaning are all speakers wired
correctly / Positive to Positive and Neg to Neg)
Are the RCA cables in good condition? (swap out for others to test and
rare that the RCA interconnects could be the issue)
I didn't want to imply it at first, but while "Gemini" is 'kind'a
semi-pro' gear, it's not great gear, but that shouldn't necessarily
cause "THIN" sound, and adjusting them should compensate for any "Thin-ness".
On that note, 'Pro-gear' often operates at a 'higher' milli-Volt level
than consumer gear. If the EQ's have RCA I/O's you're probably okay from
that aspect, but if they are 1/4" I/O's and
you're using RCA-1/4" adaptors, then that's not ideal as they're
likely +18dBV In and Out of the RCA Tape Mon jacks, and not -10dBV as
most consumer gear.
I can appreciate and utilize myself EQ, and while I do have 1/3" oct /
31 band EQ's in my 'Pro Audio / PA / Studio' systems, I don't utilize
them in my 'stereo / listening' systems. I use
'consumer' type 10 or 12 band / Stereo Eq's designed for 'Home Audio'
(gets technical, but -10dBV vs +18dBV or even +24dBv I/O levels).
I would 'strip' out the EQ's and start testing from there. A great way
to test / trouble-shoot and 'initially do audio judgments' is to utilize
'White Noise'.
You have a source of "White Noise" built into your receiver. Simply
select the FM tuner, turn the "FM Muting" OFF, and tune the dial
in-between stations
(the lower end of the scale is the best place to find clean 'hiss'
(white noise)).
Then balance Left and Right and make sure that the sound from the
speakers is 'even' and also a good time to put your ear up to all the
different drivers (woofers / mid / tweets)
to make sure that they're all functioning (don't turn the volume up too
loud for that as you'll 'de-sensitize' your ears pretty quickly).
Those are some / most of the initial tests and procedures I would try."
Issue: One or both of my speakers are cutting out
completely, or their volume seems to be 'coming and going'...
A: Generally this would likely be a problem
with something 'up-stream' from the speakers (ie; amp / receiver /
pre-amp or a problem with wires / interconnects / connections), however,
we recently had a pair of speakers (Magnet's with dual 8" woofers, a mid
and a tweeter) that had one speaker that was just 'not performing well'.
It was 'choppy' across the frequency range with no one driver not
exhibiting the issue. I assumed it was a problem with my amp / pre-amp.
Before I dove into any of that, I decided to take a DCR reading (the
speaker was rated at 4 Ohms, so I should see something around "3"). I
measured 13.2 Ohms. That's a problem. I started disassembling the
speaker, assuming there was going to be something wrong with the cross
over or someone had inadvertently wired the woofers in 'series' or
something like that. I pulled the input plate and saw 'brown and green'
corrosion all over the solder strips that were attached to the binding
posts. I got the correct 3.2 Ohms when I measured 'above' the posts and
again, 13.2 at the posts. I disassembled them, cleaned / replaced parts,
and now I got the correct 3.2 Ohms DCR at the posts. Never seen that
exact issue and my speaker tech had not caught it (should have with a
'pre-test' DCR test), only wrote that the
tweeters / mids seemed to have "issues".
Issue: The dust cap is dented / pushed in on my
speakers. Help. Do I need new speakers...
A: OK, first
off, the dust cap is dented / pushed in on one of more of your
'drivers', not your speakers. The 'speaker' is the entire system of the
cabinet and all it's components, ie; cabinet, drivers (woofers, mid's,
tweeters, etc), crossover, grill, inputs, etc. Sorry, had to get that
out of the way.
So the most correct technique will depend on what the dust cap is made
from, how 'picky' you are on final cosmetics, why are you removing it
(because the cosmetics of the dent bother you or are you repairing it
for re-sale, or are you concerned with how it will affect the sound).
Sonically, the dust cap will have more of an effect the closer it is to
the size relative to that of the of the diameter of the driver, and / or
if it is made of a less 'transparent' material, such as Mylar or
aluminum. For example, if it's a 12" woofer, and the dust cap is made of
cloth or some sort of material that can 'breath' the dust cap has little
'real' affect on the sound. If the dent is in a 1" Mylar tweeter with a
.5" dust cap, then it's likely affecting the sound in a negative way.
Certainly if the driver is a 'soft dome' tweeter or midrange' and the
entire driver surface is in the shape of a 'dust cap' and it's dented
in, it will likely have a substantially larger, negative affect on the
drivers intended performance.
The
techniques can involve a vacuum cleaner, tape, small diameter wire /
needle, water and vacuum cleaner, or a combination of techniques, or
complete removal and possible replacement.
If
the dented dust cap is made of paper (pulp), the we will typically first
try a 'shop vac' with a 'reducer' installed to more match the diameter
of the dent, concentrate the suction and to reduce overall suction power
(too much suction could cause a variety of damages). Sometimes we have
to 'wet' the dust cap (usually with water) prior to using the vacuum
cleaner (especially as the diameter gets smaller, such as on a JBL LE-25
tweeter or a Pioneer HPM tweeter). A Q-tip or small artist brush works
for application. Once dry, you often can't tell it was ever damaged. If
the dent is larger, such as on a woofer, the vacuum cleaner technique
usually works without wetting. If the dust cap is made of a coated cloth
or paper, that is not 'water soluble' then we might try Acetone to
soften it up sufficiently (be careful with 'Acetone' as it's a fairly
aggressive solvent and too much might soften / compromise the glue
holding the dust cap, spider wire attachment, or worse yet the cone /
voice coil boundary. Also, of course, follow all the warnings / cautions
on the Acetone container).
If the dust cap is cloth with a more 'open' weave, it will allow too
much air to 'blow by' and not allow the vacuum to apply enough suction.
The
next technique to try will be to pull it out with tape. This get's a bit
trickier, as you need to select tape that will be 'sticky' enough to
grab the section you need to pull out, but not so sticky that it causes
a layer of paper / pulp to pull off, or makes too much 'pulp fuzz'. We
typically will use clear packing tape or 'duct tape' (again you have to
be careful with 'stickier' tapes). You also want to try and avoid making
the dent worse when you're applying the tape (as you need to apply a bit
of pressure to the dent to get the tape to stick in the first place).
The 'middle' of a small section of tape is applied to the dent (usually
start in the center of the dent). To get nice, even pressure and amount
of tape to the dent, we will utilize something that's rounded and hard,
and appropriately sized (relative to the size of the dent) such as a
'Sharpie Marker' cap or barrel end (not the felt marker part), or the
back end of a 'BIC' pen or similar. The idea is to 'work' / rub the tape
evenly onto the center of the dent. Then pull both ends of the tape out
(usually 'straight' out and not at an angle to the majority of the
dent's surface) with enough force to try and 'pop' the dent out, but not
so much that you simply cause the tape to release. Here's the 'tricky /
risky' part. Hopefully you don't pull off the finish, cause damage to
the finish, rip / tear or remove the dust cap in the process (never had
any of the last three happen, but they're possible. Actually if you
removed the dust cap 'cleanly', that might be easier, as you could then
simply push / press out the dent from the back side, and re-glue it in
place (using correct / appropriate techniques). You may need to apply
the tape multiple times to get satisfactory results. The tape may remove
some of the finish (had that happen to the 'silver' coating on a pair of
JBL L166 / 066 tweeters
 ).
).
The
next technique is similar to doing 'body work' on a car, or dent removal
on a 'brass horn', except on a much smaller scale. It involves making
one (or in some cases multiple holes (the fewer, the better)) in select
places of the dust cap, and inserting a small piece of metal (needle,
paper clip, staple, wire, etc) to 'work' the dent out. My most used
version of this technique is to make a small hole with a sewing needle
or pin in an appropriate position of the dent / dust cap. Hopefully the
dent is fairly centered, so the resulting hole will be centered
(actually less noticeable there). I take a small staple (the kind meant
for office use / paper), and re-bend it with a loop on one end. I
usually will leave the other original in it's original 'L' shape (I
might 'shorten' it if necessary). The 'loop' serves two purposes. The
first and most important is it will keep the staple from being 'sucked'
into the dust cap by the power of the magnet (that would be a 'bad'
thing). The other purpose of the loop is to give you something to grab
onto with needle nose pliers (or similar). You will use the pliers to
manipulate the end of the 'L' on the back side of the dent to 'work' the
dent out. As you're doing this, be cognizant of not enlarging the hole
or making it 'ragged' with the sides of the staple or the tip of the
pliers. Also be mindful of leaving a 'crease' in the finish by applying
too much pressure on the tip of the staple. Sometimes this will be
unavoidable, or will just happen in the process (it's a learning process
to know how much pressure to apply, and in learning how much, you will
probably crease the surface, thus it's a 'catch 22'). Once you've
removed as much as the dent as possible with this method, you can try a
combo of the vacuum / tape to further improve it if necessary. The hole
can be sealed with an appropriate glue (such as 'gap filling Super Glue'
or a 'black speaker repair glue', or a small bit of just about any type,
that will 'stay put' and not add any more than necessary mass to the cap
/ cone. You can further 're-finish' the glue / hole with a Sharpie
marker in black or silver, or a small amount of matching paint).
Usually one of those techniques will work. If you've tried all, multiple
times and it's just not budging, and you REALLY need it out, then you
could try removing the dust cap, push the dent out and re-install /
re-glue / replace the dust cap (probably best left to a 'speaker repair
shop' unless you know what you're doing, but then again, if you already
knew what you were doing, you probably wouldn't be reading this).
Regardless of the method, you may not be able to completely remove all
evidence of the dent. At that point you have to decide if it's worth
throwing more resources at it. Sometimes they come out 'perfect',
sometimes not. It will depend on how long the dent has been there (the
longer it's there, the more likely the material will establish a
'memory' and make it harder to remove completely, at least with
utilizing only one technique).
In the end it's going to boil down to personal preference / matter of
opinion / what you can live with / how it's going to affect the sound /
how it's going to affect it's value.
Issue:
I just picked up a pair of Cerwin
Vega 15-inch speakers. Sounds great, bass is tight. I was wondering out
the midrange drivers. Do they sound normally quiet ? Sometimes, the
tweeters are overpowering the music. At the back, there is only
frequency adjustment for the tweets and midrange and no volume
adjustment. Could my midrange drivers be bad for both L+R ? Hmm..
A:
Determining if a speaker is 'balanced' takes a
very 'well traveled' ear. Sometimes we will even have to use a 1/3 octave RTA to determine
if drivers are 'doing their job'. The attenuators are generally for the
tweeter's and occasionally for the mid's, but never for the woofers, or
for 'overall' volume control. The current potentional would likely be
too great for most ‘L-Pads / Rheostats’ to handle, plus speaker mfg’s
assume you’ll simply use your receivers / amps volume control for that
and the attenuators on the speaker are simply to ‘attenuate’ the top end
and / or ‘mid end’ relative to the bass. Mid's and tweeters usually
either work or they don't, without much between. "Diminished" output
could be related to bad capacitors on the crossover, and if you indeed
do have that, then that's where I would look. Hope that helps.
Issue / Question: Can I play my speakers
with them laying on their sides?
A:
As long as a speaker is not 'vented'
thru the bottom, such as a 'subwoofer' that has a 'down firing' woofer,
or a speaker with a 'down firing'
woofer (means the woofer speaker is mounted on the bottom plate of the
speaker cabinet, facing down to the floor) (and your speaker has
neither), it doesn't 'hurt' the speaker. On reason, however that
speakers are made with the 'woofer' located on the lower section, and
the 'higher frequency' drivers (mids and tweeters) on the top is that
'bass' is 'non-directional', meaning that it will reach your ears no
matter where it's located (and you get more bass generally if it can be
'close' to the floor. Tweeters and mids are more 'directional' so it's
better to have them 'higher' up in a cabinet, ie; closer to your ears.
However, if the location 'works' for you and laying them on their side
doesn't negatively affect their sound to you, then go for it. Hope that
helps.
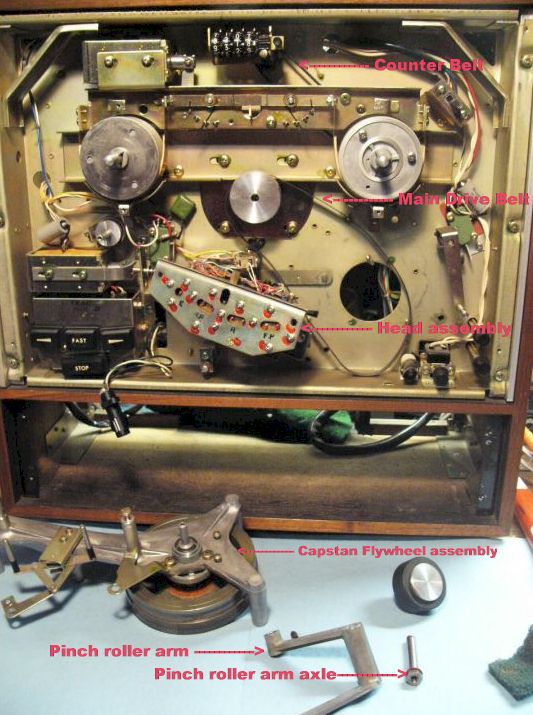
TAPE RECORDER / TAPE
DECK / TAPE PLAYER ISSUES:
(Cassette, Reel
to Reel, 8-Track, or any other device that moves magnetic tape such as
guitar tape delays, DAT machines, VCR's etc):
Issue:
My cassette tape deck / 8-track deck makes Gawd awful (motor-boating
or loud humming) noise
periodically (could be from only one channel, L or R
as well). It even causes the meters
to flutter / peg on one or both sides.
A: Often the culprit is a dirty ‘record’ switch. This is a long switch
mechanism, usually located on the ‘main’ circuit board and it needs to
be cleaned with a contact cleaner. Solution likely requires a qualified
electronics technician / repair person. As a
temporary 'fix' you could load a 'recordable' tape, and try manipulating
(pushing in and out) on the record switch 10-20 times, and that may
clear out the issue for a time. We recently had this issue on the
'Record' side of a double cassette deck, built into a karaoke system,
where there was a loud 60Hz hum from the left speaker. Pushing in the
'Record' switch about 2 dozen times fixed it for the time being.
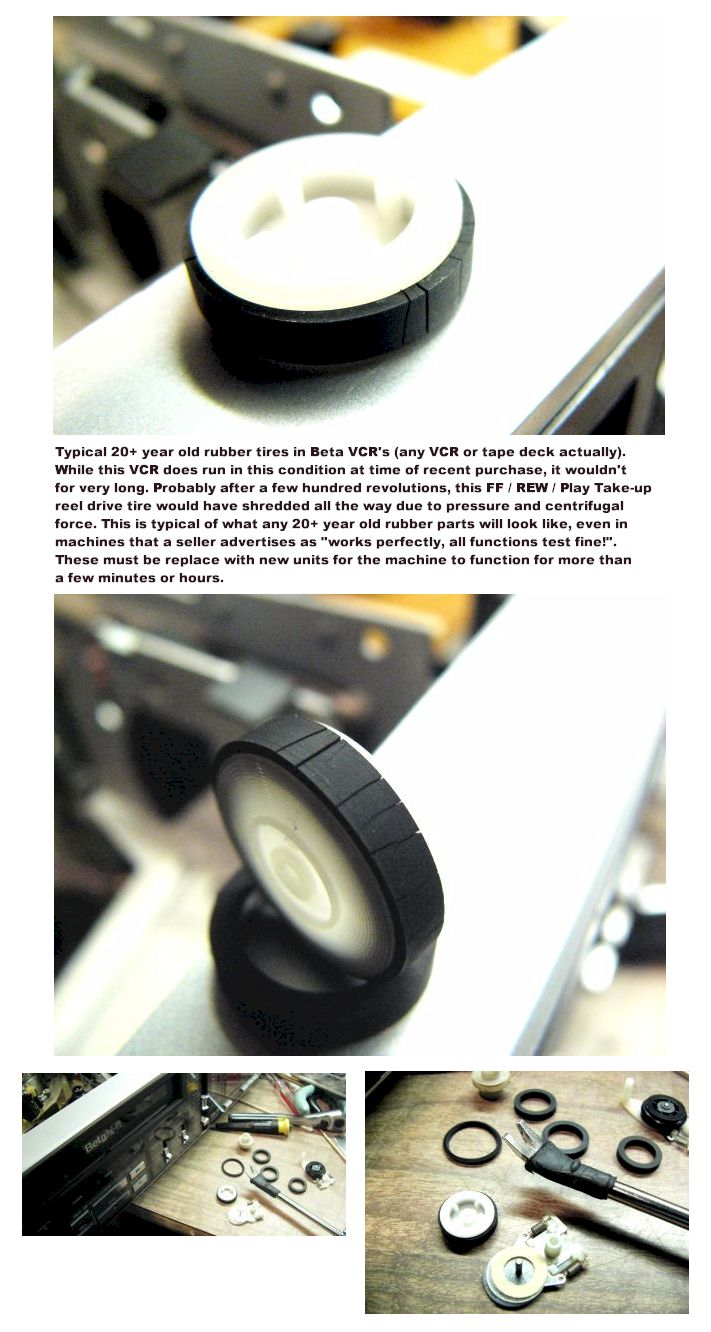
Issue: My cassette tape recorder does not Fast wind or
'eats' tapes.
A: This is one of the most common symptoms older cassette
decks present. This is usually due to a glazed /
deteriorated / excessively cracked or otherwise worn ‘idler tire(s)’ /
fast wind tire(s) / reel tire(s),
and / or the lubrication that has ‘gone south’
(gelled / coagulated / varnished / turned to 'glue' etc).
The solution is to recondition or replace the rubber tire and clean the
reel hub surfaces for correct traction. Unfortunately these mechanisms
are usually ‘buried’ under a few layers of the transport mechanism and
may not be easy to get to. The idler tires are
usually MUCH MORE important to the function of an older cassette deck
than any 'drive belts', although the 'belts' are important in their 'own right'.
(Here's something I came across while searching for another issue on the
web. There are many varietal examples of this out there, but is typical
of what is imbedded in the 'noise of the web',
"Well to be honest it looks like this is getting more difficult than
my abilities can deal with. It took me about 6 hours yesterday just to
put all the belts on. I felt really burned out afterwards and bummed
when I discovered after all that, that yes, it plays now, but still
doesn't FF/REW. Maybe I should just throw it up on CL. Still would be
nice to have a better working deck then the Pioneer CT-F500 I'm using
right now".
'Eating Tapes' can also be caused by something ‘sticky’ that has been transferred
to the pinch roller, usually from a ‘contaminated’ tape. Spilled or
sprayed soda pop on a tape is the common offender. Also a deteriorating
(sticky / tacky / gooey)
rubber pinch roller can cause this as well.
Other causes may be a bad ‘fast wind motor’ (if your cassette deck uses
one), or a lack of voltage / power to the motor
(we recently had a
Technics RS-B48R cassette tape deck that was not ‘fast winding’ or
taking up the tape when in play mode that was not getting sufficient
voltage, but the motor tested OK when external voltage was applied to
it).
(revised
5/2019)
Issue: My cassette tape recorder
makes a 'scrunching' sound that I can hear with my
ear next to the tape well and it is 'wrinkling / creasing / crinkling'
tapes...
A: So you hear any 'crinkling / scrunching'
noises with your ear right up next to the transport, and / or
when you pull out a tape that has been played on it, and there
is evidence of 'crinkling / wrinkles / creasing' on the tape section
that just went past the pinch roller.
We have seen this a few times. We don't know
necessarily why it does it, but the culprit has been (on the decks we've
had and solved it on), a rubber pinch roller(s) that need to be
replaced. On some decks, the roller 'looks and feels' fine, but once
changed, the symptom goes away. We first came across it on a fairly
recent (relatively speaking), Sony TC-850ES, 'Dual Capstan' deck. The
deck had two separate pinch rollers. 60 minute tapes seemed to play
fine, but 90 minute tapes would develop crinkles / wrinkles / creases
passing thru the transport. You could hear it happen if you put your ear
fairly close to the transport. Upon further / closer observation, the
right pinch roller had gone a bit 'soft', meaning you could press your
finger nail into the edge of it, and it would leave a slight 'dent', but
only for a moment. The 'left' pinch roller (most decks, unless
they're 'auto-reverse' won't have a roller on the left, but as this was
a 'dual capstan / closed loop' transport, it did) was very 'shiny' and
had gone 'hard'. We changed the left, 'normal sized' pinch roller, and
the problem still happed to a degree. Once both rollers were changed,
the issue went away. We recently had the issue on a Marantz cassette
deck, we had restored a few months back. Immediately following the
service, it worked fine for many tapes. We didn't get around to listing
it for sale till a few months later. Upon doing a final testing, we
found it was crinkling 90 minute tapes (60 minute tapes were not
affected). We installed a new pinch roller and the problem was solved.
(revised
2019)
Issue: The tape plays VERY fast on my cassette deck or
reel to reel deck...
A: It's usually caused by the pinch roller
/ pressure roller not
contacting the capstan with sufficient pressure. Normally the
capstan / pinch roller is what pulls the tape
thru. (Most folks, erroneously, think that the
take-up reel is what pulls the tape, but it only serves the
purpose of 'taking up' the tape after it leaves the heads / pinch
roller). Otherwise tape
would simply 'dump' on the floor (or into the
case / housing of the cassette shell). There's generally not
enough torque on the take-up reel to pull the tape from the other
reel, so this problem usually presents itself
as the tape 'slowing down'. Your 'take-up'
reel has enough torque (probably too much by the way) that it
can pull the tape on it's own (which could be much faster
than normal play speed, as you're
experiencing).
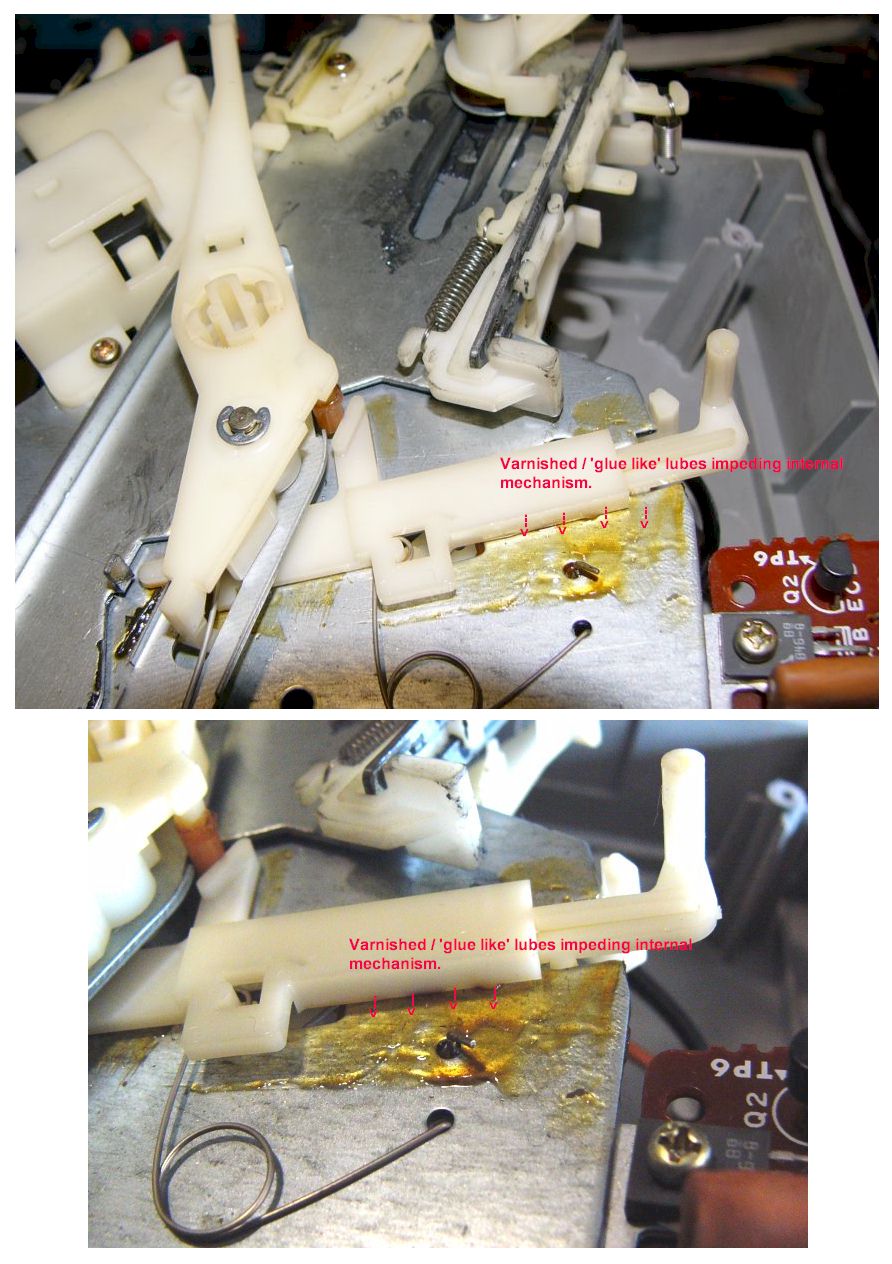
A major cause, is because the pinch
roller's upward progress is being impeded. It's likely being
impeded by old / aged lubrication that has 'jelled'.
Again, this is typical of most 25+ years and
older, 'electrical / mechanical' devices. You can test this
by putting the deck into play, and with your finger, or
appropriate tool / device, apply some upward
pressure on the center (non-rotating) part of the pinch roller. If you are able to apply enough pressure to the center
bearing of the PR to move it sufficiently against the capstan,
the tape should play at normal, or more normal
speed. If so, the assembly needs to be
disassembled, cleaned of old lubes and re-lubed. This is one of the
many aspects we address when we restore / refurbish a tape deck
(25-60 year old tape decks are not just
'repaired') for resale. They must be 'restored /
thoroughly refurbished'. This is especially fun on
decks such as the TEAC A-4010 Reel to Reel
 and
the Pioneer RT-909 / 901. Come to think of it, there aren’t many decks
that its any fun to do on, but a ‘must do’ in a list of many other
procedures that most 30 year old tape decks need to function to any
degree of correctness. (If
that's not it (but it should be), then the deck would require further
bench time to investigate.)
and
the Pioneer RT-909 / 901. Come to think of it, there aren’t many decks
that its any fun to do on, but a ‘must do’ in a list of many other
procedures that most 30 year old tape decks need to function to any
degree of correctness. (If
that's not it (but it should be), then the deck would require further
bench time to investigate.)
Another reason can be that the tape isn't threaded correctly. I recently
had a Sony TC-355 exhibiting this just after I had played a tape just
fine. I pulled the head cover to make sure the tape was seated correctly
(can't see much with the head cover in place on many late 1960's thru
mid 1970's Sony's) and realized that the tape was not seated all the way
between the correct guides thus not between the capstan and pinch
roller.
Here's a simple example that recently happened to me due to 'being in a
hurry' when threading up a Pioneer RT-1020L. Went to engage 'PLAY' and
the deck immediately started playing in almost a FF speed. I 'pressed'
down on the pinch roller, thinking that it was getting stuck (the deck
had just come out of restoration, so that was not a thought I relished).
The added tension didn't help. Tried it again, and of course 'same
results'. Sat down in front of the deck to ponder sending it back to my
tech, and noticed I had the tape running 'under' the capstan, which on
this particular deck meant that it wasn't between the capstan and pinch
roller. Re-locating the tape correctly of course rectified my mistake.
(revised
2024)
Issue: The tape plays
'SLIGHTLY' faster than it
should on my TEAC 40-4 (or a myriad of MANY
other possible decks) reel to reel deck...
A:
In the case of a 'stock' TEAC 40-4 and any other open
reel tape deck that utilizes a "Hysteresis" controlled type of motor
(meaning that it's speed is controlled from the "Hz" of your AC power
source) there's a few reasons this could be happening.
One would be the "impeded pinch / pressure roller" as discussed above.
Another could be that if the deck was not designed for 60Hz (North
American) current, and has a 50Hz motor pulley installed, or if the belt
is in the "50Hz" position, and you're using it with 60Hz current, it
would play 17% fast. You would either need to source and install the
correct pulley, move the belt to the correct position (if that is
available), or as a last resort, machine down your pulley the correct
amount.
Another reason could be (and is the impetus for the making of this
comment) the belt could be 'riding-up' on the 'lip / flange' of the
pulley instead of on the proper surface. We recently had this on a 40-4.
Probably happened in installation, and for some reason 'slipped through'
between final bench testing and final 'sign off' testing. With a hook
tool we were able to coax it into place and it's stayed put ever since.
A motor being out of alignment at it's 'thrust plate' bolts, either by
misalignment or worn rubber bushings / motor mounts could cause the belt
to track off and onto the pulley flanges.
(This could also happen on a deck with a 'DC' motor as well. Pretty much
any deck that's 'belt drive'. Could also happen to cassette decks and
turntables.
Issue:
Very little of the mechanical aspects of
the tape deck functions. It doesn’t ‘play’, Fast Forward or Rewind...
A: Most tape decks are 30-50 years old
with old rubber parts and old lubricants. If you leave a pencil eraser
in a drawer for a couple years it becomes ‘glazed’ 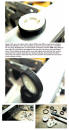 and will simply slide over paper with no
‘traction’ or tackiness. The same thing often happens to the rubber
parts in a tape deck, VCR, turntable or other electro-mechanical device
with moving parts reliant on rubber, except it happens in 12-25 years
(if it doesn’t harden and glaze, it may try and revert back to
it’s original state which is ‘goo’). Secondly oils and greases
(lubricants) loose there lubrication properties and actually ‘harden’ as
well becoming thick, sticky and ‘glue like’. Both of those issues
combine to render most tape decks and such inoperable after 20-40 years.
These issues require a COMPLETE overhaul / restoration to operate to any
level of usability
(8-18 hours typically and some can go
considerably longer).
(revised
2018)
and will simply slide over paper with no
‘traction’ or tackiness. The same thing often happens to the rubber
parts in a tape deck, VCR, turntable or other electro-mechanical device
with moving parts reliant on rubber, except it happens in 12-25 years
(if it doesn’t harden and glaze, it may try and revert back to
it’s original state which is ‘goo’). Secondly oils and greases
(lubricants) loose there lubrication properties and actually ‘harden’ as
well becoming thick, sticky and ‘glue like’. Both of those issues
combine to render most tape decks and such inoperable after 20-40 years.
These issues require a COMPLETE overhaul / restoration to operate to any
level of usability
(8-18 hours typically and some can go
considerably longer).
(revised
2018)
Issue: The Auto-Reverse does
not seem to work on my reel to reel tape
deck...
A:
There could be multiple reasons for this symptom.
Firstly does the deck 'reverse' directions, if instructed to do so
manually? If not, then there's likely an issue that can't be solved
here, and would need deeper investigation, likely by a technician
experienced in that mechanism (good luck on that one, as they're 'a
dying breed').
Assuming there's not a mechanical / electrical
issue with the mechanism itself, you first need to determine what is the
'trigger mechanism' for the 'auto-reverse'. Most reel to reel
decks required a short (1-1.5") length of 'silver metallic' tape
to be attached near each end of the tape. This would 'short' two
trigger points in the tape path, causing the deck transport to change
directions. Now if you have tapes that have the 'silver tape'
installed, you need to make sure it's on the correct side of the tape
for your tape deck, and that it's of sufficient length to make contact
between the correct pins. Secondly, you need to make sure the pins
are 'clean' and do not have a build-up of oxide (dirt) on them, that
could impede electrical contact.
Other decks, such as Sony's E.S.P. system, looked for
'blank space' in a length sufficient enough to make the 'assumption'
that you are at the end of the tape, and that triggered the auto-reverse
mechanism. The length if looks for is approx 8 seconds.
There's a 'flaw' with that system right off the drawing board, in that
if a side ends at anything but the start of the lead-out-leader, then
you will change directions, and already be into a portion of the
recorded program on the opposite side. Also, if there's a stretch
of tape that's 'quiet enough' anywhere else in the recording, the deck
may change directions there as well. Also, if you have a tape
that's 'lower quality' or just simply 'noisy', the deck may never get a
floor noise level low enough to switch. That system sometimes
works and sometimes doesn't.
There's another system that utilizes and optical sensor to
determine when the 'oxide' portion of the tape ends, and the leader
begins. This is usually found on much 'later and higher end' models.
This system works well, as long as the 'optical sensors / and light
sources' are functioning, are clean and you have tapes with leaders
installed (always a good idea regardless). It will not work on
tapes without leaders.
Most 'auto-reverse capable' cassette tape decks simply
rely on the tape reaching the 'end' mechanically, then reverse, simply
based on the tape 'stopping' (triggered by a variety of mechanisms).
I'm not aware of a reel to reel that utilizes this system.
(revised
2018)
Issue: I have a cassette deck that now does not want
to PLAY, FF, or REWIND. It tries for a moment, but then stops...
A: There can
be a number of reasons for that, including a bad 'main drive belt' (if
all of the functions rely on 'one motor and one belt'), or lots of
gelled lube, but the most common reason is that there is a problem with the tape counter
belt. Many cassette tape decks / recorders / players utilize the
movement of the tape counter mechanism (usually with a 'photo optic' or
'magnetic' sensor) to sense tape movement, or more importantly, tape
'non-movement'. When all is working correctly, 'non-movement' of the
tape, usually means that it is at it's 'anchored end' on the reel, and
the deck either needs to 'auto-stop' or 'auto-reverse' (if equipped with
either feature, and most have at least 'auto-stop'). While there can be
issues with 'frozen' tape counters, the typical reason a tape counter is
not moving is a bad counter belt (it's either broken, stretched too
much, or deteriorated). Again, there can be other reasons as to
'non-movement' of the tape, but the first, most likely candidate is an
issue with the tape counter belt. (revised
2018)
Issue:
My Reel to reel will not go into 'fast wind'
(fast forward or rewind) or only 'goes slowly' or starts off fast, then
slows down, to a crawl, or I have to 'help it'...(but works OK in 'PLAY'*
mode)
A: There are a few things
that could be the culprit here. The first thing to mention is that if
the room temperature is 'too cool / cold' a unit might perform
sluggishly as opposed to how it would perform in a 'warmer' room.
Anything in the 'low 60's' F could cause issues with lubes, especially
when you consider the lubes already may be 30-50 or more years old, and
lubes increase viscosity with lower temps (think about how slow your car
turns over when cold, and if you have a manual transmission, how letting
the clutch out, even in neutral, causes drag on the engine till
everything warms up a bit).
The next thing (and this is a VERY
common issue) to check for is cleanliness of the tape path. If you are
playing a tape that is 'stick / tacky' or the last tape you played was,
and it left excessive residue on the tape guides etc, then that can and
usually will increase 'drag' enough to 'stop' a fast wind motor (or
bring it to a 'crawl'). We've seen this
numerous times. Solution: Clean the tape path (all the guide pins,
tension arms, heads, pressure pads and anything that the tape touches), and don't use that tape
anymore. (the reason it doesn't affect play* is that the tape is 'pulled'
through the deck by the capstan / pinch roller for play, and for fast
wind, the 'reels' do the work. The Capstan / Pinch-roller has a lot more
torque, than the reels, especially as more tape is added to the
'take-up' reel (the one that is 'pulling'). *If
the 'deposits' are bad enough on the components of the tape path, then
'play' speed will start to be affected.
The 'fast wind' motors
on most 'full size' reel to reel decks are 'AC' motors, and the AC
motors in reel to reel's typically utilize 'start / run' capacitors
(just like your garage door opener, washing machine, furnace,
dishwasher, clothes dryer, bench grinder, air compressor etc).
Capacitors go bad with age, and the start run capacitors in reel to reel
decks are now 30-60 years old (far past their intended life span) and
likely need to be replaced. Barring 'gelled up lube' in the motor
shafts, bad / old / aged 'start / run capacitors' may be the issue. Now
having said that, I rarely see an issue with start / run caps in reel to
reel decks (and I've probably done 150 refurbishments in the past 20
years), but it's worth a try as start / run caps are way cheaper and way
easier to throw at a deck, then sourcing and replacing motors.
(DIAGNOSING / REPLACING START / RUN CAPACITORS IS A PROCEDURE BEST LEFT
TO A QUALIFIED PROFESSIONAL / TECHNICIAN, AS THE VOLTAGES INVOLVED CAN
POTENTIALLY BE DANGEROUS, DESTRUCTIVE AND LETHAL!!!)
Issue: My TEAC / Tascam Reel to Reel will not go into 'fast wind'
(fast forward or rewind) or play, or anything. Nothing Moves...
A: There are a few things
that could be the culprit here. While some could be issues discussed
previously / above, many are likely 'user / operator error'. Yes, I know
that hurt's but things like the tape not being fed through it's correct
path is a common one. Reel to Reel tape decks not only need the tape to
be threaded thru the tape path correctly, but usually to have some
tension 'pre-loaded' to 'pull the tension arms 'up' (or at least to the
position that defeats any 'auto-stop' mechanisms). This is not just an
issue with TEAC / Tascam, but will likely be an issue with any deck. An
issue that is 'fairly' unique to TEACS and maybe some TACAMS is that
many of the earlier units have an round, multi-pin 'Remote' port on
their rear panel. If you do not have the remote (and few folks do),
there needs to be a 'dummy plug' inserted into that port (or at least
the correct terminals need to be shunted), or nothing on most TEAC R2R
decks will move. I've seen techs spend hours, pulling their hair out
trying to figure out what is 'wrong' with a TEAC deck, only to hours
later discover that it needed a 'dummy plug' to function.
On most Sony's, Hitachi and likely a few others, there's a small 'wire'
that 'hinges' up when the tape is threaded correctly in it's path. This
'wire' is part of the 'auto-stop' mechanism. If you inadvertently load
the tape 'above' the wire, or it somehow ends up in that position thru
changing transport modes, the deck will not play or fast wind. The tape
path will need to be corrected to be 'under' the auto-stop wire.
Issue: My TEAC / Tascam / Pioneer (and likely most
other, "3-Motor" decks) Reel to Reel will turn / spin the reel on one
side. I can hear a motor running when I select the function, but the
reel doesn't spin, at least not very well. Everything else seems to work...
A: This is not
a common problem, but can be caused by loose set / grub screws on the
reel hub, that secure it to the reel motor shaft. There are one to three
of them, and a qualified tech would need to check them (means simply
re-tighten them (minding the reel table alignment with the tape path)).
If the motor does not start or stay running once
started, you could also have weak / bad "Start / Run" capacitors on the
motor circuit (we see this on Pioneer RT-901 / RT-909 models fairly
often). Or, the motor bearings could be so dry (need cleaning and
lube) that the motor is locking up. (revised
8/2019)
Issue: My Otari MX5050 Reel to Reel will not turn the
reels properly when I have 10.5" reels installed. They simply 'spin' on
the reel tables, and / or I hear a 'chatter / clicking' noise. Also when
I press "STOP" when 'fast winding' the reel dumps tape / doesn't stop
immediately...
A: Otari made
special / specific NAB hubs and 7" reel locks for their machine. If you
are using a 'non-Otari' NAB adaptor that pushes into the reel from the
front, you have to make sure that you don't have more than about 1/8" of
space / gap between the back edge of the reel and the back of the NAB
hub surface. The 'tridents' on the Otari MX reel tables are not very
tall (they don't protrude as much as most R2R's), and if you're using
NAB's that don't come almost flush with the back of the reel, the
tridents either won't engage at all or not enough. I've tried a few
different NAB's and the Pioneer PP-220 and PP-220A seem to work well
with our Otari Reel clamps.
Issue: My Reel to Reel dumps/spills tape / doesn't stop
immediately when I press stop, BUT only on certain tapes...
A: The
condition of the braking mechanism (specifically bands, shoes, pads etc)
may be at fault, or the brakes may need to be adjusted, or both. We
recently had a Sony TC-730 that would brake fine with 'plastic' tape
reels installed, but with Maxell aluminum reels on both sides, it would
spill tape if stopped during fast wind about half way thru the tape. The
aluminum Maxell reels weighed about 2.5 ounces more each than the
plastic reels which was enough to make a difference. We adjusted the
brakes for the metal reels and all was then good.
Issue: My Sony TC Reel to reel or Teac A-4010 and
others of this style does not ‘pull’ the tape through in ‘Play’ mode...
A: The Teac A-4010 and most Sony ‘TC’ series R2R’s are over 35-50+ years
old (actually there are no ‘Real’ Reel to Reels made since about the mid
1990’s ("NO", that ‘strange’ 1/8” RCA made about a decade ago doesn’t count, sorry) and like most
R2R’s, they have gelled / varnished lubricants. The A-4010s’ pinch roller is
on a ‘pivoting’ arm mechanism and will invariably be in some stage of
‘sluggishness’ up to completely ‘frozen’ and immobile. The only solution
is to remove it (usually requires heating the bushing either with a
'large' soldering gun or a 'focused' heat gun or similar), completely
cleaning and re-lubing. Once done, it will be good for another 20-40
years. The Sony requires a similar procedure, but has a lot more parts,
and is more complicated to disassemble, then to get it all back together
correctly.
One 'temporary' test you can do to prove that the above is the issue is
that you can 'push' up on the pinch roller at it's center to see if that
then allows the tape to pull thru at the correct speed. You may be able
to put something in the center, or your fingernail against the hubcap if
there is one (and there usually is).
I will correct part of the
statement above. There IS a NEW reel to reel being made in Germany
http://www.ballfinger.de/tape-recorder-m-063 (revised
2025)
Issue: The tape tends to 'track off' or skew out from
the pinch roller / capstan on my reel to reel tape deck...
A: While many tend to blame the 'pinch roller' or bent or skewed tape
guides, I have usually found this to be the fault of improper 'back
tension' on the supply reel and on a couple of occasions, too little
pinch roller pressure. You can test that theory by applying a bit
of 'caliper braking' action to the outside edge of the supply reel with
your fingers while the deck is playing. Not much, just a bit, and the
tape will usually come back into alignment. Unfortunately, this is not
usually an easy thing to correct. On earlier decks, such as Sony's, it's
done with a clutch made of felt, on others, with brake pads. On 'single
motor' decks that don't have any adjustment, adding some 500,000 grade
silicone lube can sometimes do the job. On later, 3-Motor
decks, it's typically done with a small amount of 'reverse' voltage
applied to the 'supply reel motor' (not something to mess with unless
you're qualified).
If the back tension is 'maxed', you can still affect it
with adding pressure with your fingers, then it's likely lack of 'pinch
roller' pressure. You can test this theory, by adding pressure to the
pinch roller, towards the capstan. If you're able to do it quickly
enough when you see the tape 'start' to skew, and the added pressure
pulls the tape back to the correct path, then you've probably determined
the problem. Some decks may let you adjust pinch roller pressure (such
as 'three motor' units), some
may not (single motor models).
Regardless, any of the measures to
address the 'tape skewing' symptom, any repair is not particularly 'end
user friendly' is beyond the scope of this page.
You'll typically need to seek professional assistance for that one.
(revised 2022)
Issue:
My Reel to reel won't pull the tape through, or tries to 'dump / eat'
tapes, or won't pull the tape through very well with certain 'leaders'
attached, but works once it get's past the leader section...
A: Yes, we recently came
across that ourselves with one certain type of leader (freshly ordered
and installed 'white' leader) on a Sony TC-580. There were no problem
with other leaders (Maxell UD-XL or TDK Audua as examples), or with
'leader-less' tapes. Only the tapes with the 'recent / new white'
leaders installed. We don't know why or what the 'fix' would be. We
simply have to 'manually' help the tape come through the leader by
spinning the take-up reel till it gets past the leader section.
(revised 2018)
Issue:
My Tape deck doesn't 'RECORD' onto the tape...
A: This one will definitely be a "work in progress",
as there's a myriad of reasons / causes for this. I'll touch on them as
they come to me.
1) Do you have signal all the way up to the tape deck (multiple ways to
verify that).
2) Most decks require you to press the "RECORD" switch(es), while you
press "PLAY". There were some later (think late 1980's and newer
'Cassette Decks' that had a feature called "OTR" (One Touch Record), but
early decks did not.
3) If you have a 'Three-Head' deck, make sure you have good signal when
selecting "SOURCE" on the tape deck. That is also the initial level to
set your 'Input' controls with.
4) Are you confident you have 'known good' RCA / DIN / Interconnect
cables?
5) Is the 'Record' adequately head clean?
6) Is there a chance (applies to Reel to Reel tape) that the tape has
been 'inverted' and you're trying to record on the wrong side
7) I recently had a tape that simply would not record. Tried it on two
different R2R decks. Switched to another of the same brand and model of
tape, and it worked perfectly.
8) Is there a chance (applies to Reel to Reel tape) that you have "EE"
(Extended Efficiency) tape that you're trying on a 'non-EE' deck? If so,
you won't get much signal transfer to it, and it won't erase the
previously recorded tracks very effectively.
Beyond the above (and again, I will add more as it
comes to me), you may have a technical issue with the tape deck, ie;
dirty / intermittent 'RECORD' switches (try manipulating them repeatedly
and see if symptoms improve), a wire or internal connection that
has become compromised (commonly the connections at the head, but would
be very odd for 'both' channels to become disconnected), open
coils on the 'RECORD' head (VERY rare to have happen and again, even
more rare to affect 'both' channels), internal issue with
circuitry (beyond the scope of this conversation).
(revised 2019)
Issue: When I PLAY tapes on my reel to reel /
cassette tape deck / 8-track deck, etc, the sound is fairly 'muffled' /
muted / dull...
A: Dull / Muffled sound when playing a tape can be from a number of
causes. First would be to question / verify the quality of the tape and
/ or original recording, but for the purpose of this writing, lets
assume you have a tape that's of 'reasonable' quality (I would
check it against a number of tapes to verify that more solidly).
Older, or 'poorly recorded' tapes, or 'lower quality' tape formulations
/ brands can sound muffled, or have 'drop outs' in the signal, so you
want to rule out any issues stemming from the tape itself.
Also, regarding reel to reel tape, another 'tape related' issue can be, is there a chance the tape is
inverted (on upside down (or in the case of an 8-track cartridge or
cassette tape, 'twisted' somehow))? This is usually indicated by 'muffled sound'
and likely playing 'backwards'. This does happen for various reasons,
and may take some 'thinking' to rectify by a combination of inverting
and fast winding the tape once or twice to correct the issue. Beyond
issues with the tape itself, probably the first thing to look at is the cleanliness of the playback head(s). From a 'cleanliness' standpoint, there should be no oxide
build-up from tapes, no corrosion, or anything. If there is, then they
should be cleaned. This is usually best accomplished with a good head
cleaning solution, or denatured alcohol and cotton swabs. Never use
anything abrasive or with a hard edge. The heads should be cleaned
fairly regularly anyway.
Are the controls set correctly for maximum sonic
quality? If Noise Reduction such as 'Dolby' is being utilized,
that will diminish top end response. Are the 'Tape EQ' switches set
correctly (generally have more of an effect on recording, depending on
the deck). If the tape was recorded at a slower speed, the high
frequencies may be reduced beyond what you're used to if you normally
play tapes recorded at 'higher speeds'.
Dropouts / 'cyclically muffled' sound:
This effect / issue can be caused from a number of
situations, but was likely due to the tape being exposed to a 'magnetic
field'. Examples of this can be from a vacuum cleaner motor ran too
close to them, a furnace motor (I had this happen to most of my cassette
collection that was stored in racks, mounted on the wall, that happened
to have the F.A.G. furnace located just on the other side of the wall),
someone storing or sitting their tapes on just the 'right' speaker, in
just the 'right' way (this one happens often), tapes sat on top of a TV
or near it's power supply (magnetic flux from it's power transformer).
Another example of how this can happen is someone owns / utilizes a bulk
tape eraser, and isn't cognizant of other tapes in close proximity.
Another potential cause can be tapes that exhibit Wrinkling / wrinkles
(wrinkled tape / warped tape):
Occasionally a tape (typically applies to reel to
reel tape) will appear fine while tightly wound on the reel, but
as the layers come off (often for the first time in decades), the tape
will develop a ‘wavy’, wrinkled appearance. If the wrinkles / waves are
ONLY near the first couple of layers, then it might not be an issue, but
depending on multiple factors, it quite likely will continue throughout
the tape. This usually renders the tape ‘un-listenable’, at least from
any kind of decent quality standpoint, as the ‘waves’ will cause the
tape to cyclically come away from the tape playback head, causing a
‘drop-out’ effect in the sound. Sometimes only one half of the tape will
be affected, and the other half may sound fine.
One possible solution
that may be acceptable for 'wrinkled tape syndrom'
is to use a deck that applies pressure to the outside surface of the
tape, thus pressing it firmly against the playback head for a more
‘even’ coverage of the head by the tape. Many Sony reel to reel tape
decks made from the mid 1960’s into the early ‘70’s have a small metal
‘tab / plate’ with a felt pressure pad affixed that does just that. If
you can acquire one of those decks that have been restored / refurbished
to functioning condition, that may suffice. Barring that, you could try
and apply pressure manually in some manner. Again, any method of
applying pressure to the tape to try and negate the effects of ‘tape
warp / wrinkling’ is at best a ‘better than nothing’ solution.
Depending on track
format, and your need for that tape / recording, you’ll have to decide
if it’s a ‘terminal’ issue.
The next issues become a bit more involved to rectify and may require a
qualified technician with correct test tapes, tools and test equipment.
Also, due to the effort involved in the next remedies, replacing the
tape deck with a quality, competently serviced one may be a better
solution.
Look at the condition of the head to tape surface. If there is excessive
head wear, then the sound will be lacking the high frequency it should
to the degree of head wear. It may also exhibit proportionally less
overall output. This can be due to 'head gap' widening, but is more
likely from the tape being 'held' away from the head, by the edges of
the channel that may be worn into the head. The tape may 'ride' up or
'curl up' the edges of the 'channel' and pull a few microns away from
the head (yes microns make a big difference when it comes to
magnetic tape reproduction quality). To determine if you have
excessive headwear (and most decks do have some degree of tape head
wear), look at the 'shiny' surface of the heads. There may actually be a
visible flat spot worn into the apex of the. If you run your fingernail
over the head from top to bottom, you will likely feel the edges of a
channel that has been 'cut' by the tape. The degree of this cutting
action / depth of the channel will determine the amount of sonic lose.
It usually takes substantial wear for most folks to have an issue with
the sonic characteristics of worn heads. If 'head wear' is the culprit,
then there are two options. The first and most common (at least in the
'old days') would be to have the heads 'lapped'. Lapping heads is not a
process for the un-initiated and is a fairly 'lost art' today. If
lapping your heads is not in the cards, then replacing the heads may be
the next remedy, although finding heads will not be easy either, nor
getting them correctly installed.
The next more common issue and easier to approach is to adjust head
alignment / azimuth. If the head Azimuth is 'out' of adjustment, then
that will cause diminished high frequency response and / or overall
output. While it is possible to get the alignment / azimuth 'fairly
close' or maybe 'close enough FOR YOU' by ear, to do it correctly
requires official alignment tapes and test equipment such as a
dual-trace oscilloscope (that's what we do it with).
Another possible cause of diminished output, although a
cause only attributable to a 'handful' of tape decks, would be worn felt
pressure pads. Remedy is to replace the pad with a correct part and
realign it correctly upon installation.
I suppose an additional reason could simply be that
you're applying a 'Noise Reduction' system, commonly Dolby. Even if a
tape is encoded with Dolby, you will still typically notice a reduction
in high frequency. Or if you have a 'high filter / treble filter'
engaged on your pre-amp section. Turning those off if 'inadvertently'
engaged may satisfactorily improve the sonics for you.
You could of course, have a combination of the above
issues, so the issues would need to be attacked in the correct order. If
you have 'excessive' wear, then likely no amount of adjustment will
compensate for that. If you have excessively dirty or corroded heads,
and you don't rectify that, then adjusting will not likely help. If your
tapes are the cause, then nothing will likely help, at least not at the
tape deck level.
Lastly there could be an electronic issue with internal
playback amps, and level controls. These again, are not generally 'user'
addressable solutions.
(revised 2019)
Tape Deck:
Issue:
sound starts off
quiet / muffled then volume increases and sound improves after it plays
for a few moments...
A:
This is usually caused by the
mechanism that moves the tape head up into it's play position being
'sluggish', which will likely be due to stiff lube / grease (similar to
the issue with the Pioneer RT-909 mentioned above). The old, stiff lube
needs to be cleaned and the mechanism needs to be appropriately re-lubed
(similar to the issue that plagues Pioneer RT-901's / RT-909's and TEAC
A-1000's, A-1200's, A-1500, A-4010's and 6010's and other similar decks
pinch roller arm mechanisms).
Issue: When I play my 'small / transistor / pocket /
portable / mini reel to reel player / recorder, the tape playback tends
to speed up / increase or slow down / decrease / pitch changes as the
tape progresses...
A: In the 1960's and early 70's, small / transistor reel to reel tape
recorders were abundant, especially prior to the prevalence of the
'cassette' format. They were especially utilized for 'letters to home'
with GI's and their families sending 'taped letters' back and forth, to
and from Vietnam. The reels were easily mailed due to their 3" and
smaller size. Interestingly, some of the 'lesser' quality / cheaper
priced decks did NOT use a 'pinch roller / pressure roller' to pull the
tape through as most reel to reel tape decks did. They simply relied on
the 'take-up' reel to pull the tape across the heads. This technique was
known as 'rim drive'. Other than being a
fairly 'un-reliable' way to move the tape, it did not present a speed
problem as long as you played the tape back on the same deck it was
recorded on, or another deck of the same design. However, if you
recorded a tape on a 'normally designed' tape deck with a capstan /
pinch roller (a 'capstan / pinch roller design' maintains a
constant tape speed) and then tried to play it on one of the
cheaper / 'non-capstan/pinch-roller' decks, the tape playback speed
would increase 'gradually' as the tape spooled from the supply reel to
the take-up reel (this is due to simple physics; as more tape
fills the 'take-up' reel, it's diameter increases, thus causing the
speed at which the tape is pulled across the heads to gradually and
continually increase). If a tape were originally recorded on a
deck without a capstan/pinch-roller and it were played on a deck WITH a
capstan/pinch-roller design, the tape speed will be 'perceived' to be
slowing down (read the above and deduce why from that).
Thus if you are going to be playing the 'small' tapes that were likely
recorded on a small / transistor / portable tape deck, it helps to know
which tape transport design the deck had. Again, most of the better /
more expensive decks used a capstan / pinch roller. The cheaper decks
omitted those parts.
(since the speed increase / decrease is 'gradual and constant'
transferring to computer and then trying to adjust playback speed /
pitch is not really practical)
(revised 2018)
Issue:
When I try to change tracks on my 8-Track tape player /
deck, the track indicator lights flicker or don't come on at all when it
switches...
A: There are a couple of possible reasons for the issue. Either the
lights are burned out, or the internal contacts on the 'track change
mechanism' are corroded. When we are restoring decks, it's standard
procedure to replace all the indicator lamps. Having done that, it's
VERY common for the contacts that allow the lamps to light when the
tracks are changed to be corroded. We will disassemble that mechanism
and burnish all the contacts (re-springing them if applicable). That
will usually fix all the issues with the track indicator lamps not
glowing.
Issue: My reel to reel tape deck is 'noisy' / has
a lot of motor / mechanical noise...
A: There can be a lot of
contributors to a deck that seems excessively noisy, mechanically. The
motor may need to have it's bearings / bushings cleaned and re-lubed.
That would generally mean a complete disassembly of the motor which is
typically quite involved. If the motor has already been cleaned and
re-lubed, and it still seems to be the source of excess noise, then do
the process again, utilizing a higher viscosity lubricant.
The motor mounting components may need to be
assessed. There may be rubber components that need to be replaced or
'improved upon'.
We've had a couple of engineers suggest changing
the 'start / run' capacitors. We've tried that on a couple of machines
to no avail.
If it has 'idler tires / driven wheels' the
rubber will definitely need to be resurfaced / reconditioned / rebuilt.
Their bushings also need to be cleaned and lubed properly. The idler
tires can sometimes have 'run-out' (be 'out of round'). That can
typically be visualized or 'felt' and will be 'cyclical.
There may be other mechanisms / assemblies that are
vibrating sympathetically with any noise being generated, thus adding to
the 'chorus' or 'amplifying' what's already there. Anything buzzing,
vibrating, rattling etc will need to be damped by some means that
doesn't interfere with the operation of the unit. The housing / case /
enclosure can also be an 'amplifier' for any noise generated. Internal
damping material can help there or some method of isolating it from it's
environment such as our 'Sorbothane'
isolation pods.
Sometimes, there's nothing that can be done. Some decks
are simply noisier than others. In those cases we've been able to reduce
the noise, again by utilizing our our
'Sorbothane' isolation pods.
(revised 2018)
Issue:
Reel to Reel tape deck records signal that 'comes and goes' /
cyclically increases and decreases in strength and the tape appears wavy
between the tape guides and heads...
(this was not an emailed question, but an
unusual issue we experienced here at the shop on a recent restoration,
specifically on a Sony TC-580)
A: Before I directly address
the specific issue above, there is a somewhat similar symptom that has a
completely different cause from the 'fix' for the above. Some older reel
to reel tapes will exhibit crinkling / wrinkling / waviness as the tape
is un-wound from the supply reel. The tape will appear fine initially
while wound tightly on the 'supply' reel, but as it 'peels' off, it
becomes quite 'wavy'. This waviness will appear throughout the entire
length of travel thru the tape path. The act of the tape winding onto
the take-up reel will not improve it, and the tape will retain the
waviness. This in turn will inhibit it from winding tightly / flat onto
the take-up reel, which in turn will mean that the tape will now not
likely 'fit' onto the take-up reel anymore. We are not aware of a 'fix'
for this. There may be a 'baking' technique that can address it. To at
least play the tape to a possible acceptable level, a deck with
'pressure pads' can help. Most decks do not have 'pressure pads' in
front of the heads, but quite a few 'late 1960's' Sony decks did.
Now on to the original query. We had never seen
this particular issue. When recording a signal, the one of the playback
meters was immediately showing a cyclical increase / decrease in the
recorded signal (it was a "3-head" deck so this was quick to observe,
and of course the 'incoming signal' was not showing the issue on the
meters). Upon closer observation we also noticed that the tape was
twisting back and forth between the innermost tape guide and the pinch
roller (think of the
Tacoma Narrows Bridge
in
Washington State, often referred to as
Galloping Gertie (video link) that collapsed in 1940). The pinch
roller had already been reconditioned via the method we recondition all
of our pinch rollers, but it was still the most likely culprit (this was
an 'Auto-Reverse' capable deck and we observed the issue playing in the
reverse direction, although not as pronounced). I had the tech pull the
pinch roller and with it in an engineers square, we could see the it was
not perfectly true / 90°.
We discovered that the surface of the tool we reconditioned with had
'gone south'. Once the issue with the tool was rectified and the pinch
roller re-resurfaced the problem was solved.
(revised 5/2019)
Question: "I have a Nakamichi 582 cassette deck and I'm planning to
put that amongst other components in a vintage stereo cabinet... problem
is the only way to get all my components to fit is to mount some of them
vertically (faceplates facing up). Do you think this might cause any
mechanical issues if I do this with my cassette deck? Would you
recommend against doing this?"...
A: I'm not aware of any cassette deck that would have
an issue or problem playing in a position other than 'horizontal'. Some
Reel to Reels could have an issue if their 'tension arms' rely on
gravity to function properly, but cassette decks do not utilize those.
The only issue I can think of would be if the capstan flywheel(s) have
worn or missing or insufficient 'thrust bearing surfaces' it could
create noise, but that would be a problem in and of itself, and not to
do with the physical orientation of the deck / transport.
Issue: When I try to change tracks on my 8-Track tape player /
deck, it won't change, just clicks...
A: The playback / record heads are mounted on a vertical post that
allows the head stack to move vertically to the different track
positions. This is done by a 'ratcheting / cam' system. Time is not a
friend to lubrications in any thing, including tape decks. Most moving
parts are going to have lube's associated with them, and those lubes
have likely gelled / hardened to a degree somewhere between 'slightly
less slippery' to completely varnished / hardened solid or near solid.
The lubes of the head mechanism on an 8-track cartridge tape deck are no
different and will need to be completely removed / cleaned off and
replaced with the correct lube. That is part of the restoration process
we do on our own decks we sell.
Issue: The tape counter on my Pioneer, Realistic etc
8-track doesn't work. I've changed the belt, and the belt is fine, but
the counter won't turn...
A:
.
I could sell a ‘truck load’ of 8-track counters if I had them, as
they ALL, (pretty much across the brand /
model board) are either broken or on the verge
of breaking (maybe not today or tomorrow, but it will happen
sooner than later). They all are plagued with a nylon ring gear,
on a steel shaft that has cracked due to shrinkage. When the “Ring gear”
rotates to the ‘split’ point
(allows that space between those two teeth to widen)
it won't mesh properly with the worm gear’ the counter locks up.
Best to forget about a counter, remove it, and put some black, vinyl
tape over the openings.
(ps; on the rare occasion we have a 'working' 8-track counter to
sell, we warn the purchaser that it's probably 'not long for this
world'. We also tell folks that purchased restored / serviced decks from
us, that occasionally have 'working' counters, the same thing.)
Issue: My tape deck doesn't play from one side, but
the meter is responding to what should be on the tape, just no sound /
output to my receiver / headphones...
A: So this was an odd call we
had the other day, but a fairly easy one to troubleshoot. Generally (I
actually can't think of an exception) if you have Tape Playback signal
that excites the meters (and you're not monitoring 'Source') you should
have ample signal to the outputs. There's not much reason it could be
the tape deck. About the only reason you wouldn't is from a compromised
solder joint or wire (unlikely). The problem is likely downstream from
the tape deck. In the case of this call, the user was monitoring only
with headphones (actually connected to the RCA outputs of a Sony TC-377
Reel to Reel then to a headphone amp, computer etc). He then connected
to the headphones to the front panel headphone jack and was still
missing one side. I suggested he try another pair of headphones, and
that fixed it. He had a compromised pair of headphones.
Issue Regarding Akai 4000 Series reel decks and their speed sleeve:
"Hello. Before ordering. First let me ask you a question. My name is
Alexandtru, I live in România în Europe. I previously had four Akai GX
4000D tape recorders. All have deviation at speed by 1% more. With a
recorded test tape instead of 700HZ I have 707HZ on the oscilloscope. I
mentioned that I have asked other GX4000D users, and the same problem.
From what I understand there is a common problem with them with original
SPEED SLEEVE.
The question is. If you know about this problem and do you make SPEED
SLEEVE with the fixed correction. Because the original one gives a
deviation of 1% more. Thank you! Alex D."
A: Hi , Thanks for visiting oaktreevintage.com.
So, I am familiar with the 4000 in all its different iterations. We have
restored / refurbished a few of them over the years. I actually like
those machines from a standpoint of being a design that lends itself to
successful restoration, HOWEVER, it is a lower/mid line ‘consumer’ grade
machine with an “AC current” capstan motor. It appears that you are
maybe trying to utilize it for your music production company.? I am not
familiar with any scuttlebutt out there regarding them always playing
“fast”, but maybe…? Firstly, are you sure your test tape is correct? We
have about a dozen different test / alignment tapes we use here at the
shop, and NONE of them are exactly the same as any other when it comes
to speed. We have 2 or 3 that are very close to each other that we
switch between.
So I pulled the worksheets for all the “4000” decks
we’ve done over the years and in looking at their ‘post restoration’
speed tests with a 1kHz tape, I see the following results; 1005Hz,
1004Hz, 993Hz, 995Hz, 1010Hz, 1001Hz, 999Hz, 986Hz, 997Hz, 980Hz, 993Hz
& 1009Hz (didn’t realize we’d done so many).
There is no mechanism on that deck for adjusting / fine tuning speed. In
fact, the service manual only mentions “speed” regarding “speed
deviation” and the way they suggest to test for that is to take a
measurement at the beginning, middle and end of the tape. Now I don’t
know what length the official Akai test tape at the time was, but likely
not a long as a normal 1200-2400’ tape. I can’t imagine their test tape
being long enough to matter, but if you had a normal length, blank tape
(1200-2400’), the amount of force required to pull the tape thru would
change throughout the travel of the tape.
You could machine down the flywheel or further machine down the sleeve
if you’re convinced that your test tape is accurate (we actually did
that once on a Sony that was -30Hz at 1000Hz (meaning it was playing at
970Hz). We took the flywheel to a machine shop to get it milled down
{and they said they did not want to do that again as it was a “pain”}).
Frankly if you need it to be that critical, I would get a machine with a
‘DC’ motor and either in internal, or external or both fine tune / pitch
adjustments. Then you can get the machine say, at 1000Hz to be 999Hz to
1001Hz or maybe even better.
As far as our sleeve, they’re definitely “consumer grade”. It is always
a challenge on every batch over the past 25 years of making them to get
the machine shop to get them as accurate as possible. There have been
many times that we’ve had to have them re-worked multiple times to get
them as close to perfect as possible. If you have an original, I would
just stick with that (assuming you’re still set on using an Akai 4000
series).
If you still wish to get one of ours to add to your tool box (but
frankly it won’t be as accurate as an original from a speed or Flutter
standpoint), then here's a direct link to our “Akai / Roberts Speed
Sleeve” page that shows those (As there are multiple speed sleeve
versions for many different Akai / Roberts models shown on the page,
Scroll or search to locate your model listing on the page for the
correct speed sleeve):
http://www.oaktreevintage.com/Akai_Reel_Tape_Deck_Capstain_Speed_Sleeve_Replacement.htm
Just let us know any further questions you have once you view. If you
wish to place an order, please do so directly from the ‘Buy Now’ button
on that page. We are always looking for more stuff. Keep checking as we
never know from day to day what will arrive. Good luck and thanks again,
Jerry at www.oaktreevintage.com
AM/FM STEREO TUNER
/ RADIO ISSUES:
Issue: My Stereo Tuner / radio has bad reception, or doesn’t pick-up
stations strongly.
A: Are we talking AM or FM?
If you are referring to AM:
First of all, stereo receivers are not known for
having stellar AM performance in the first place. There are a few
exceptions to that, but generally that's what's experienced.
Having said that, if the receiver has a
rear located ‘stick’ AM antenna, change / manipulate
the position of the built-in ‘stick’
antenna located on the rear of the unit (some receivers have the
‘stick’ inside and there’s little you can do about it’s position).
If it has a rear located ‘stick’ AM antenna, there usually an adjustment
screw inside the end of the antenna 'stick' housing (or slider
with a button on the side). You can try adjusting slider / screw
for better reception. Some later model receivers (after about the early
1980’s) most tuners / receivers switched to a detachable ‘loop’ style AM
antenna. This is more easily manipulated, but in my experience does not
typically perform as well as the older style ‘stick’ type antennas. The
best solution may be to install a high quality external / roof mounted
antenna (rarely seen these days).
If we are talking FM: Is an antenna installed at all? I can’t tell you
how many times folks call with an FM reception issue, and they have no
antenna installed at all (called not reading the owners manual).
Or they say, "Yes, it's that little 'stick / bar
thingy' in the back...right?". No, that's the AM antenna.
Most receivers / tuners do not have any type of FM antenna
‘pre-installed’, but do have connectors on the rear. The simplest
(read cheapest) solution is to obtain a simple 300-Ohm, ‘Folded
Di-Pole’ antenna wire and connect it to the antenna barrier strip screws
on the rear on the stereo receiver / tuner. Traditionally this wire
antenna is ‘tacked’ up on the wall behind the tuner. Even though it’s
less than a $10 fix, this is usually more than sufficient for 95% + of
listeners needs. For even better performance, again a more expensive,
‘externally’ mounted / attic / roof mount antenna can be obtained. Many
‘old school’ TV antennas, had / have FM capabilities.
For some reason, the general public has forgotten the importance of an
antenna to pick up radio stations. In the 1930’s thru the 60’s I would
say everyone from kindergarteners to grandmothers knew the importance of
an antenna. Nothing in physics has changed and they are still just as
important.
If none of the ‘antenna approaches’ improve the situation, your
‘vintage’ tuner likely needs to visit a technician and be at least
‘re-aligned’ as 30+ year old components have most likely ‘drifted’ in
value from when the tuner was originally aligned. A technician may
discover other issues as well, but typically a general cleaning and
basic alignment is all that is in order. Actually the cleaning /
alignment was probably in order regardless of what antenna solution you
chose.
Tuner issues can be
‘challenging’ to even seasoned technicians and require skill sets and
test equipment specific to tuners that not all technicians possess.
Recent email we received regarding reception;
Question; "Good morning, I have a Pioneer SX-2300 Receiver for which I
need a new antenna. I only have a turntable and speakers hooked up to
this unit. Turntable sound and speakers are great. But trying to
maintain an FM or AM station is sketchy. Any ideas on how to maintain
consistent output? Thanks! Kate"
My response; "Thanks for visiting
oaktreevintage.com. As far as “FM”, Normally you would use something
that looks like this and it works fine for 99% of folks:
https://www.amazon.com/Bingfu-Terminal-Bluetooth-Receiver-Amplifier/dp/B07MG2XYR6
If you already have one like that, and it’s still not working, AND the
tuner portion of your receiver is working correctly, AND you’ve moved
the antenna around with no good results, AND there are FM stations
within a practical distance to pick-up (say less than 50 miles or so),
AND there’s not mountains / buildings blocking the signal, then it gets
more complicated. You’d need some sort of mast with a much more
elaborate antenna connected and / or an electronic amplifier possibly.
As far as AM, most of the above still applies, except night time is
better than daytime and AM can travel further distances, and not
typically affected by obstacles as much as FM. FM typically works better
on cloudy days (as the signal bounces off the bottom surface of the
cloud water vapor somewhat), and AM works better in clear weather, again
especially at night.
Normally just a piece of wire a few feet long works for "most" folks for
either FM or AM. Good luck and thanks again,
Jerry at www.oaktreevintage.com
PS. Here’s a kit for FM and AM on Amazon if you have determined that you
don’t have the proper antennas;
https://www.amazon.com/Antenna-Ancable-Pioneer-Marantz-Receiver/dp/B07Y7ZM4XM/ref=pd_lpo_2?pd_rd_i=B07Y7ZM4XM&psc=1
"
Issue: My (solid state) Stereo Tuner / radio has a lot of noise /
buzz / hum when on AM stations.
A:
There are
numerous reasons / causes for extraneous noise when trying to listen to
AM 'specifically'. Assuming you have an adequate antenna, AM reception
quality can still be anything from 'non-existent' to very clear, and can
vary from time to time. As we all know (or should know), AM reception is
better at night than the day (you can research the reasons why on
plenty of other web destinations). Thunder storms are the typical
cause for intermittent static, but as far as a constant 'buzz or hum',
that is usually caused by a 'local, environmental' source. Some common
ones are nearby fluorescent lights (including CFL's),
sodium lights (we have that issue in our warehouse here at Oak Tree
Vintage) and TV's with CRT's (picture tubes), electric motors
running nearby (shavers, blenders, coffee grinders, blow dryers) etc.
There are probably plenty more, but that should get you thinking in the
right direction.
Issue: My radio receivers’ / stereo tuners' tuning
string is broken and the dial pointer won’t move
A: While this may not seem like it should be, this can be a fairly
‘serious’ / pain in the ‘you know what’ issue. If the tuner string has
not gotten moved from its’ original ‘path’ you may be able to ‘retrace’
it with a new string. If you cannot retrace the exact path, or at least
source an original diagram from a service manual showing how to restring
it, then it may be almost impossible to repair correctly. Even if you do
manage to get the ‘path’ correct, getting the correct tension back is
also very difficult. Finally getting everything back in sync is the
final difficult step. I don’t want to ‘rain on your parade’ too much,
but I can’t tell you how many times I’ve been approached by someone
wanting to sell me their stereo receiver saying something like “all it
needs is a new piece of string on the dial”. That’s right up there with
“all it needs is a couple of little knobs, and you can get those down at
Radio Shack”. NO YOU CAN’T and if you're trying to
bring a unit back to original condition, those issues really
become and are BIG DEALS!
‘Antique Electronic Supply' has replacement
string (yes it is ‘special’ sting) and their website is:
www.tubesandmore.com
. There are some ‘Radio Restoration’ books out there that have a
number of different ‘string path diagrams’ for some of the antique
radios that might be of some use.
Issue:
The ‘tuner’ knob on my stereo is very ‘stiff’
or won’t move at all, or you used to be able to give
it a 'spin' and the dial would travel most of the length of the scale,
not it stops after 1 or 2 revolutions...
A:
We are seeing this more often as of this writing
(revised Jan 2019). After 25-50 years
or more, flywheel / tuning string
shaft lubes will have become gelled / gummy / varnished. I have actually seen them bad
enough to completely ‘freeze’ the shaft in it’s bushing and then someone
tries to turn it with so much effort that they can
actually ‘twist’ off and
break the tuning shaft. Recently we were 'coming down
the home stretch' on a Pioneer SX-580, and the flywheel 'froze up' and
wouldn't move. Prior to that it had been moving decently fine. It will need to be disassemble, cleaned and
re-lubed (be careful in disassembly to note how the EXACTLY how
the tuning string is wrapped so that string can be CORRECTLY re-wrapped
and re-tensioned). (On the previously mentioned,
"SX-580", we could not get the bushing / axle disassembled. We applied
heat and still could not get the two parts separated. Fortunately we had
another 'salvage / donor' Pioneer SX-580 to pull the flywheel from.
Interestingly the spacing on the two were slightly different (even
though they were the original parts, from the same model), so the
replacement had to have a couple shims added to clear the front face of
the unit.)
We are seeing this as an issue more often (as in quite
frequently now) than in past
years, again, I can only assume it's because the lubes are hitting the
end of their useful life. If you are going to undertake the job of
cleaning then re-lubing it, do it before it completely 'freezes' up, and
that can happen within the span of a few 'revolutions' of the tuning
knob.
Hey, once it's done, it should be good for another 30-50 years. Yee-haw!
(revised 2019) (3/16/2021:
just had the same symptom on a Concept 6.5. Started doing it on about
day 3 of it's refurb, just as we were putting the final cosmetic parts
back on. We should have thought of it before as now we're stripping the
front back down. Oh well, better now than later)
Issue: Turning the stereo tuner knob does not move tuning dial
pointer consistently or proportionally.
A: The tuning string is slipping on the
flywheel shaft. The string may need to be ‘cleaned’ and re-tensioned, or
ultimately replaced. We have had ‘limited’ success increasing ‘traction’
with a small amount of violin bow rosin applied to the string after
cleaning. This however can lead to ‘string overlapping’ (see next
issue).
Issue: My tuner / radio knob spins / turns for a few turns,
then ‘locks-up’ and stops before dial
pointer gets very far or to end of dial.
A: This is usually due to the tuning string ‘jumping or climbing over’ /
‘overlapping’ on one of the winds on the tuning flywheel shaft (there
are typically 3) and getting ‘caught’ by a previous winding. This is a
‘PITA’ issue and we don’t have a ‘tried and tru’ fix for it short of the
above mentioned steps or replacement of the string or ‘bad section’ of
string. This is can be a difficult issue to resolve.
Issue: My ‘digital’ tuner does not hold memory or is
erratic or has ‘weird’ symbols in the display.
A: Some tuners use a ‘back up battery’ to retain the station memory. The
battery may even be necessary to the proper function of the tuner. The
tuner ’back up battery’ is likely bad and will need to be replaced.
These are commonly soldered in and may require a qualified electronics
technician to repair, not to mention a 'special battery' to either be
ordered or made.
TURNTABLE
/ RECORD
PLAYER / PHONOGRAPH ISSUES:
Issue:
My Turntable / record player ‘howls’ / rumbles
when I play it, especially when I try and turn the volume up.
A: This is caused by ‘feedback’ between the speakers and the tone arm
'pickup cartridge'. The record / platter / tone-arm combination is
resonating sympathetically to the sound emanating from the speakers. The
closer the turntable is to the speakers, the more of an issue it may be.
I’ve actually seen folks set the turntable directly on a speaker. That
will result in almost instant feedback, even at low volumes. Some stereo
cabinet / turntable combinations will ‘amplify’ feedback due to their
natural tendency to resonate. Some ‘cheap’ turntables are in housings,
especially the cheaper plastic type, that tend to ‘ring’ and encourage
feedback. You may need to experiment with different turntable placement
/ locations. A good solution may be to mount the turntable and / or
speakers on good isolation feet. We have our turntable sitting on
Sorbathane isolation ‘hemispheres’ (and it’s a Kenwood KD-550 ‘Concrete’
base turntable), but unfortunately the cabinet I have it in is very
resonate and encourages feedback. The Sorbothane ‘fixed’ it. Here’s a
link to our ‘Sorbothane Page’:
http://www.oaktreevintage.com/Isolation_Feet.htm
Issue: My Turntable / record player ‘hums’ /
'buzzes', even when it's not spinning...
A: This is a common issue, and is usually proactively
addressed by the turntable manufacturer by adding a 'ground wire' which
should be connected to the Gnd lug on the back of your receiver /
amplifier. Some turntables will not have a ground wire. In this case,
you could try 'reversing / inverting' the AC plug in the AC outlet. This
will sometimes reduce the 60Hz hum / buzz. You will likely always have
some hum / buzz if you turn the volume up enough on your amp / receiver,
even if the grounding system is correct. This can sometimes be reduced
further by adding / modifying grounds, but that is beyond the scope of
what can be covered here.
Or, consider an issue we had with a recent
turntable. We had a BSR table with a 'magnetic' cartridge installed. We
were getting a fairly 'sharp' sounding 60Hz buzz. "Sharp" meaning that
it wasn't just a 'hum', but had a 'treble' component to it which made it
have more of a 60Hz 'click', that also seemed to be intermittent, would
be more prominent on one channel for a while, then would be on both
channels. This particular model, BSR Chassis model #185, had 'de-tachable'
RCA cables, and a removable 'sled' / carriage for the cartridge to mount
to the headshell. He replaced the RCA patch cables, and of course
burnished and 're-sprung' the contacts for the cartridge carrier as part
of the original restoration. We discovered the 'excess' hum / buzz while
I was auditioning it for final inspection / signoff. On my 'test
receiver' I noticed the excess 60HZ buzz. We tried inverting the AC cord
(which of course had no effect as the motor wasn't spinning, but you
start with the easiest / simplest stuff first). We swapped RCA cable
channels, but buzz still persisted intermittently left to right. Then he
revisited the cartridge carrier contacts, still to no avail. Then he
replaced the cartridge with a new one, still to no avail. I noticed some
'intermittency' with the input selector on my receiver, and thought
maybe that was causing it. I had another receiver handy to try, however
a receiver swap did not address it. Then I thought to install another
set of RCA patch cables / interlinks. I didn't suggest this first, as I
assumed they were soldered in place, and would take an inordinate amount
of time (relative to other procedures) to change. He then informed me
that they were 'removable'. He had installed standard, inexpensive
RCA's. Most of our better turntable restorations / refurbs include
upgrading the RCA patch cables / interlinks as a matter of course, but
again this was a BSR. He had actually tried that, but the RCA jacks on
the BSR are very close to each other (like on some vintage Pioneer
receivers BTW) so that's why he chose the entry level / $5-8 cables, as
they have 'thinner' plug housings. We tried a number of upgraded RCA
cables, until we found a set we could 'just get to fit' side by side.
Once we turned everything on, 'viola'...problem solved. As I've always
said a $10,000-$50,000 audio system can be brought down by a $3 cable.
.JPG)
.JPG)
Issue: My Turntable speed
adjustment ‘knobs’ are erratic and won’t hold the platter at a steady
speed.
A: The speed potentiometers / controls need to be cleaned internally.
Issue: I've connected my
turntable to my receiver / amp, but can barely hear any sound. It's low
and not very clear...
A: There
are a few potential causes
that come to mind and we're going to assume a
'magnetic cartridge' is being used.
1) Did you connect to a proper "Phono" input? Most vintage / quality
receivers / integrated amplifiers will have a phono pre-amp built-in,
and without that, most turntables will not deliver much if any sound. If
you don't have a proper "Phono" input, you can add one, then use any
'analog' input (AUX, Tape, CD, Video, etc). While pre-amps can cost
$5,000.00 or more, a $30-$50. one will be adequate for most folks.
2) Are you trying
to connect a turntable with a 'Moving Coil / MC' cartridge to a 'normal'
phono input designed for a "MM / Moving Magnet" cartridge. You'll need a
"Moving Coil 'Head Amp' " as the MC cartridge has a MUCH lower output
than a MM cartridge.
3) Are your patch
cables good?
4) There could be
an issue with the Phono Pre-Amp or some part of that circuit in the
receiver / amp. (beyond the scope of this writing and would need to be
addressed by a qualified tech, or again, simply purchase an external
pre-amp and connect to another input)
5) There could be
an issue with the turntable, ie; Bad tone-arm wires, compromised
internal connections, loose fitting headshell connections etc. (beyond
the scope of this writing and would need to be addressed by a qualified
tech)
6) There could be
an issue with the cartridge / stylus, ie; bad internal coils, internal
magnets broken off or 'de-gaused', too many 'dust bunnies' inside, or
broken or sheared off stylus or bent cantilever. Replace the
cartridge or stylus or preferably the complete
cartridge / stylus combo. The problem can also be due to a severely
mal-adjusted, ‘Anti-Skating’ coupled with much too light of a tracking
force. If the issue cannot be attributed to a stylus problem, then
re-adjust the ‘Anti-Skate’ and tone arm tracking force. Here is a link
to our page of NEW TURNTABLE CARTRIDGES / NEEDLE combinations:
http://www.oaktreevintage.com/Turntable_Cartridges.htm
(revised 2019)
Issue: My turntable speed controls won’t turn far
enough to get the strobe / speed correct. I've turned it all the way and
it's still too slow / fast.
A: Most turntables have ‘first stage’, internally located, speed
potentiometers
(sometimes
erroneously referred to as a 'rheostat', which is a different kind of
'attenuation' control, usually used for larger amounts of current, than
a 'variable resistor / potentiometer') that likely need to be adjusted (and cleaned as well).
There may be ‘access ports’ on the bottom plate for adjustment, that may
or may not be marked. They are not something that needs to be accessed /
adjusted by the user typically. Sometimes the bottom plate must be
removed to access them. The bottom plate would need to be removed to
properly clean them anyway. This is not a particularly easy task to do
either way, as it requires adjustment under the table, while it is
running. Probably a repair best left to a qualified electronics
technician.
(revised 2018)
Issue: My turntable tone-arm drops too fast and
'bounces the needle' or way too slow, or the tone-arm
won't move up or down at all...
A: Most turntable tone-arms are ‘damped’ by a silicone fluid and
sometimes this can leak out. This will cause the tone-arm to drop too
fast. If the tone arm is dropping way too slow, then the original
silicone damping fluid / oil has become too viscous or has foreign
matter contaminating it. Either way, the silicone damping fluid / oil
likely needs to be replaced with fresh, probably 500,000 grade silicone
oil / fluid / gel (maybe 300,000 grade silicone damping fluid, or a
mixture of the two). To replace it, the tone arm cuing mechanism will
need to be disassembled, cleaned and then have the silicone gel
replaced. If it is prone to leak, it will likely take 20-30 years to
leak out, so probably not worth addressing the 'future leak’ aspects. We
see ‘leaked out silicone cuing gel’ commonly on turntables such as the
Pioneer PL-40, PL-41, PL-50, PL-51 & PL-61.
(revised 2018)
Issue: My Pioneer
PL-40, PL-41, PL-50, PL-51 or PL-61
turntable runs slow,
slows down, takes a long time to come up to speed, won't turn well in
cold temperatures...
A:
We have learned that the platter motor on this series of Pioneer
turntable, has to be disassembled and have the bushings / bearings
cleaned typically 2-3 times. Once cleaned THOROUGHLY, then re-lubed.
Also, the 'CORRECT' belt is fairly 'rare' and needs to be tested for
correct speed once replaced (I see lots of replacements there that
aren't correct). We usually have to try a few on each table with a
'strobe disc' to get a correct one for each table (All are 'long' (by
normal standards) and the most correct one can range from 30.0" to 35.1").
(revised 2018)
Issue: My Pioneer
PL-40, PL-41, PL-50, PL-51 or PL-61
doesn't 'Auto-Return'
the tone-arm very consistently or not at all...
A:
The 'return' mechanism for the tone arm on this series is fairly
'un-orthodox', but once restored (or at least verified to be functioning
correctly) does work well. It's 'restoration / refurbishment' is a
'massive undertaking' and very complicated to get returned to correct
function. Also requires 300,000-500,000 grade silicone gel.
Issue: My turntable doesn’t ‘start’ automatically, or
the platter won’t start turning or very little of the
'Auto' functions operate correctly, or at all...
A: Most issues regarding a turntable ‘not running’ or not
‘auto-starting’ in the case of a ‘Fully-Automatic’ turntable, can be
attributed to gummy / varnished lubes,  with the exception of an issue
due to a worn / stretched ‘belt drive’ or ‘idler drive’ table, and then
we would additionally look at the rubber belt condition or that of the
rubber idler drive tire. Besides replacing the belt and reconditioning
any rubber drive wheels / tires, disassembly, cleaning and re-lubing
EVERYTHING is in order. The platter spindle is the first thing to
disassemble, clean and re-lube (almost every BIC turntable will have a
'stuck' platter, ie; BIC 940, BIC 960 & BIC 980 to name a few). If the
turntable is ‘belt drive’, then the motor spindle needs to be checked
for ‘free-running’ condition and cleaned and re-lubed as necessary. If a
belt has ‘melted’ around the motor pulley / spindle, then that could be
impeding its motion and will need to be addressed accordingly. In the
case of an ‘automatic’ table, any moving parts associated with the
mechanized movement of the tone-arm will need the same treatment. Some
tone-arms are driven by a motor / belt and that may need to be serviced.
If it's on a linear tracking turntable, the tone-arm will almost
assuredly be driven by a separated motor / belt and if the belt is
broken or stretched the tone-arm will not move, thus the platter may not
start. Also the tone arm moves along a rod that should be lubricated,
typically with silicone damping fluid / oil in the 300,000 to 500,000
grade.
with the exception of an issue
due to a worn / stretched ‘belt drive’ or ‘idler drive’ table, and then
we would additionally look at the rubber belt condition or that of the
rubber idler drive tire. Besides replacing the belt and reconditioning
any rubber drive wheels / tires, disassembly, cleaning and re-lubing
EVERYTHING is in order. The platter spindle is the first thing to
disassemble, clean and re-lube (almost every BIC turntable will have a
'stuck' platter, ie; BIC 940, BIC 960 & BIC 980 to name a few). If the
turntable is ‘belt drive’, then the motor spindle needs to be checked
for ‘free-running’ condition and cleaned and re-lubed as necessary. If a
belt has ‘melted’ around the motor pulley / spindle, then that could be
impeding its motion and will need to be addressed accordingly. In the
case of an ‘automatic’ table, any moving parts associated with the
mechanized movement of the tone-arm will need the same treatment. Some
tone-arms are driven by a motor / belt and that may need to be serviced.
If it's on a linear tracking turntable, the tone-arm will almost
assuredly be driven by a separated motor / belt and if the belt is
broken or stretched the tone-arm will not move, thus the platter may not
start. Also the tone arm moves along a rod that should be lubricated,
typically with silicone damping fluid / oil in the 300,000 to 500,000
grade.
We recently restored a Technics SL-1950, DD,
Fully-Automatic turntable. Great table once we restored it, but that
required completely disassembling every internal part of the mechanism
(probably 50+ parts), cleaning them in lacquer thinner, re-lubing each
part with correct type of lube, and reassembling. This operation is
similar to taking your dad's pocket watch apart, but it must be done for
the table to function.
Issue: The needle (tone) arm
on my
Montgomery Wards (insert; BSR, Magnavox, Pennys, Sears, Zenith, or any
other brand (changer / stacker) turntable, picks up, goes
across to the end of the album never and sets down, then returning to
the arm rest. I can stop it manually and sit the needle on the record
and it will play. Any suggestions...
A:
Most issues with 40-50+ year old turntables, especially any with
automatic features / functions (and a changer / stacker has the most
'auto functions') will be attributed to 'varnished / gelled' lubricants.
There is likely a mechanism that is stuck, and not
'catching' something that it should on the way to the beginning of the
record. I'm surprised you get any function out of it. The best
solution is to have a qualified tech type person, clean and relube ALL
mechanisms (meaning any and every moving part needs to be disassembled,
cleaned and relubed with an appropriated lubricant (oil or grease)). As
long as that degree of work is being done, any
/ all rubber parts should be reconditioned as well. This is pretty much
a 'restoration', and not any easy task, and not for everyone.
Issue: The tone arm on my record player / turntable
just skids / skips across the record.
A: This is usually the sign of a broken or sheared off stylus or bent
cantilever. Replace the stylus or preferably the complete cartridge /
stylus combo. The problem can also be due to a severely mal-adjusted,
‘Anti-Skating’ coupled with much too light of a tracking force. If the
issue cannot be attributed to a stylus problem, then re-adjust the
‘Anti-Skate’ and tone arm tracking force. Here is a link to our page of
NEW TURNTABLE CARTRIDGES / NEEDLE combinations:
http://www.oaktreevintage.com/Turntable_Cartridges.htm
Issue: The tone arm / needle won’t go all the way to
end of a record.
A: There are a couple of causes for this. The motion may be impeded by
the counterweight being ‘too far forward’ and partially touching the
‘gimbal’ bearing mechanism. Assuming it is the correct counter weight
for the turntable / tone arm, then use lighter head shell / cartridge
combination (you could also potentially add a bit of ‘mass’ to the rear
of the tone-arm, then re-balance the tone-arm, but you’re on your own
there. Maybe try some lead tape (get it at a ‘Golf Pro Shop’.
Harbor Freight sells 'stick on' wheel weights that work as well). Another
reason for the movement of a tone-arm being impeded could be gelled /
varnished lubricants, but we rarely see that as an issue in a tone-arm
Gimbal bearing assembly. There further could be an issue with the pivot
pins / points in the tone-arm Gimbal bearing assembly. We have seen
that, but it’s typically on the ‘cheaper’ turntables, with a lot of
‘plastic’ parts. We rarely see it on ‘quality’ turntables.
(revised 2018)
Issue: My tone arm / needle doesn’t start or end at
correct place on the record, or it ‘sets down off the edge of the
record’.
A: Barring issues again, with ‘gelled / varnished’ lubricants, this is
usually a ‘Lead In / Lead Out’ adjustment issue. This can typically be
adjusted. On some turntables, there is a small port / hole near the
tone-arm bearing assembly to allow access to the adjustment. This hole
is usually covered with a small rubber plug. On some tables, you must go
underneath the table, or worse yet, disassemble the table, or remove the
platter to get to the adjustment (a really stupid design). Some tables
require some part of the mechanism to be ‘bent’ to make the adjustment
(again, a really stupid design). Regardless of how the adjustment takes
place, typically ‘a little goes a long way’ when you’re making the
adjustment. Usually, you are adjusting the ‘Lead-In’ and the ‘Lead-Out’
will be 'relative'.
(revised 2018)
Issue: Help, the entire ‘end’ of my tone-arm is missing...
A: Well, which end do you mean? If you mean the ‘back end’ where the
counter weight is (was), then that is bad, and may not be practical to
‘chase’ a solution for. This usually is damage inflicted by not removing
the counterweight, prior to packing for shipment.
If you mean the ‘front end’, then that’s not necessarily a ‘big deal’.
If your turntable utilizes a ‘universal’ type head shell, then those are
readily available. The sign your table uses a ‘universal’ type head
shell, is that the tone arm will have a slight ‘S’ or ‘J’ curve to it.
If it has a ‘straight’ tone arm and is missing the headshell, then you
will usually need to source a correct one (usually matching the ‘brand’
is sufficient). Once a head shell is obtained, then a cartridge can be
installed.
Issue:
The
platter on my 'belt drive' turntable doesn't start / move...
A: The first and primary reason that the platter on a
'belt drive' turntable doesn't move / turn is because there's an issue
with the belt. It's likely either severely stretched, broken, 'tracked
off' it's correct position, missing, or turned to 'goo'. Belt issues can
usually be deduced by removing the platter (usually just 'lifts' off on
a belt drive turntable {may need to give the spindle a slight 'tap' with
something hard, while pulling up on the platter to get it to release}).
If there's an issue with the belt, determine that the motor runs while
you're in there. Simply try and start the turntable, with the platter
removed, and check the motor spindle / pulley for rotation. If it's not
spinning, then you likely have a more serious issue. If the motor is
spinning, then address the belt.
Issue: The
belt (or at least what I think was the belt) has melted and turned to
'goo' under the platter of my turntable...
A: Yes, that happens to the rubber in many units,
including turntables, tape decks of all types, VCR's, Film Projectors
and just about anything with rubber parts over 25 years old. The belt
was reverting back to it's natural state, a 'gooey / tar-like'
substance. You will need to get all the old 'tarry rubber' off of
everything with a proper solvent before installing a new belt / rubber
part.
Issue:
I have
a 'Linear Tracking / Tangential Tracking' turntable (such as Technics
SL-5, SL-6, SL-10 etc) and the arm won't move laterally (across the
record)...
A: There could be a few reasons for that. There's a belt
that connects a computer controlled / servo motor to the tone arm
mechanism. That belt likely needs to be replaced due to deterioration of
the rubber, or it's 'stiffened' into one shape, or broken / stretched
etc. ...
Or the high viscosity silicon gel / lube on the tube that the tone arm
moves across on is missing, insufficient, dirty (it 'holds' any debris
such as dirt / dust / hair / fuzz etc that comes into contact with it)
or has 'hardened' to the point as to impede the tone arm carriers motion
and needs to be completely / thoroughly cleaned and replaced...
Or there's an issue with the circuit that controls the motion or an
issue with the motor...
Or some of the 30+ year old nylon / plastic parts have broken in such a
way as to block or bind up the mechanism...
Or .....
Regardless of the cause, they're generally no 'user repairable /
addressable' issues and will likely need a visit to a qualified
technician familiar with working on linear tracking turntables.
(revised 2019)
Issue:
When I press "Return / End", the tone-arm drags
the needle laterally across the
record...
A:
So, when you ‘cue’ the tone arm up with the manual “Cue Up / Down”
control , does it clear the surface of the vinyl or not? I am going to
guess that it does the same thing and drags across the record.? You
should consult a service manual if you can locate one for your turntable
(or a very similar model) or possibly the owners manual, but there
should be an adjustment screw for this. I am going to guess that there
hasn’t been much clearance for a while, and it has just gotten to the
point where it’s touching the record.? There is typically a ‘crescent’
shaped rest (in front of the pivot point of the tone-arm) that goes up
and down with the cuing mechanism and that the tone-arm rides on. There
should be a small, slot head screw facing upwards somewhere on it that
adjusts it’s ‘up and down’ limits. That probably needs to be tweaked.
You should currently see some UP / Down movement in it when the "CUE"
selector is manipulated, just not enough. Don’t go too far in the 'UP'
direction, or the tone-arm won’t sit down on the vinyl as it should. I
would probably adjust for about one and a half times the thickness of an
LP above the surface of an LP on the platter (there's probably an
'official' amount for each turntable model, but as I write this, I don't
have any particular specified amount). Just make sure the cuing
mechanism lifts the tone arm high enough to allow most albums and some
with slight warping not to touch the stylus (needle) when in the 'UP'
position. If you're dealing with a 'stacker / changer' table, there may
still be an adjustment, but you need to take into account the total
thickness of the maximum number of records you might stack at any one
time. That should take care of it. If not, your table may have an
internal issue that will need qualified assistance.
Issue:
I have a BIC turntable and the platter is stuck /
doesn't move / is very stiff, etc...
A: BIC TURNTABLE ISSUES.
Wow, where do we start. Yes, we know the common issue is a ‘frozen’ or
stuck platter due to hardened / gelled / varnished lubes, but in our
opinion the BIC 940, 960 & 980 have multiple basic ‘design’ issues
(at least from a standpoint of trying to resurrect them 40 years later).
Sorry, but we’ve essentially ‘written off’ restoring anymore of those
units. They’ve cost us too much in time and money resources,
so now they're on our 'no fly list'.
Issue:
I have a 'Stacker / changer' turntable and sometimes
the records 'hang up' and won't drop, or sometimes it drops 2 at a time...
A: Yes, that's correct. Sometimes they will do one
or both. Even a properly serviced / restored changer will do one or both
of those things.
The
"Changer / Stacker" functions will generally work best when used
with pre 1980's albums due to the larger center hole diameter of
older records. They also can sometimes work with up to 4 or 5 albums and
even 6 on some table / record combinations, but generally function
best with 3 or less stacked at a time. Occasionally a 'stacker /
changer' will either 'not drop' a record, or may drop more than one at a
time. The physics of the mechanism / record hold size and internal shape
will be different on various records, and it's not, nor never was a
'fine science'. Having said that, stacked records will 'drop and play'
in order, just fine, the majority of the time on a fully serviced /
properly refurbished record changer / stacker. Now we
have to assume that you are experiencing those symptoms on a properly
serviced / fully refurbished 'stacker / changer' table. If not, then it
would need to be completely serviced / refurbished before you can deduce
'detailed issues' with the changer / stacker mechanism.
(revised 2018)
MISC HINTS / ISSUES:
Issue:
My audio
timer doesn’t keep time well, or ‘jumps ahead hours’, or is simply
erratic...
A:
Audio timers use a ‘memory battery / capacitor’ internally, and after
25+ years, this will undoubtedly be ‘on it’s last legs’ and if the unit
still functions at all, it’s battery is ‘running on vapors’. The
solution is to replace the battery. While the batteries are available
from some electronics parts sources (such as MCM Electronics) this is
typically a job best left to a qualified technician.
Issue: I need
replacement lamps / bulbs for the dial on my Stereo / radio. Do you have
them, and / or what voltage they are?...
A: At this time we do not sell replacement lamps / bulbs. We generally
have to test each unit we are restoring on the bench to determine which
lamp / bulb to re-install in each position (as exact originals may no
longer be made, or impractical to source). We get most of our bulbs /
lamps from: www.mcminone.com ,
www.partsexpress.com , www.tubesandmore.com ,
www.vintage-electronics.net , Radio Shack, and a few other sources
including some ‘real’ electronics parts shops close to us. If you
contact most of the places, with the exception of
www.vintage-electronics.net
and say,
“I need a lamp / bulb for an XXX brand, XXX model unit”, they are not
going to have a clue what lamps you need. You will need to figure that
out by ‘lamp’ number or original lamp / bulb catalog number. Better yet,
turn the unit over to a qualified technician to do the ordering and make
the changes.
People that sell ‘Bulb kits’ / ‘lamp kits’ have likely deduced all the
light bulbs / lamps that a unit needs by actually going through each
unit and making notes as part of a restoration, (or possibly going
through a service manual) then sourcing all the correct, or closest to
correct lamps and putting those parts together as a kit. It’s actually a
difficult process to come up with all the correct lights in most stereo
receivers, especially on the larger, more complex models.
Issue: How do I connect an Equalizer, reverb, or dynamic
range expander to my system?...
A: Generally the best way is to utilize a SEPARATE ‘Tape Monitor Loop’.
Most ‘old-school’, ‘2-channel’ receivers, integrated amplifiers, and
pre-amps have a separate tape monitor. You connect the ‘Tape Record’ on
the receiver / pre-amp to the EQ ‘Input’ and the ‘Tape Play’ on the
receiver to the EQ ‘Output’.
A second best, less desirable way, is to ‘insert’ the EQ or other signal
processor into the Pre-Post loop, usually marked “Pre-Out” and “Main /
Power-In” or similar (most lower to ‘mid’ priced units will not offer
this feature). This is a less desirable point as you are changing your
‘Signal to Noise’ ratio every time you adjust the ‘volume’ control on
your receiver / pre-amp, but it’s typically, excusably negligible.
The third and least versatile way to do it, although sonically fine, is
to relegate the EQ to only one ‘external’ source, such as a CD player,
DVD player, MP3 player, Tape Deck or other ‘line-level’ device. Unless
you have a separate tuner, you could not use it on the AM/FM of a
receiver. Also, unless you were utilized an ‘outboard’ phono pre-amp,
you couldn’t use it in this manner on a turntable.
(How do I know if I have a ‘Separate Tape Monitor’. If the ‘tape
monitor(s)’ is a switch, separate from the rest of the ‘Input/ Source’
selectors, ie; AM/FM, AUX, PHONO, and / or when you engage the tape
monitor, and it doesn’t ‘cancel’ out the AM/FM, AUX, PHONO, then you
have a separate tape monitor loop. Prior to about 1983 or 84, it’s
almost a ‘given’ that units will have separate tape monitors. After
that, sometimes, the tape monitor was combined with the other inputs and
won’t work with an EQ or any other signal processor.)
Issue: If I have a service manual or
schematic, I can fix my unit….Right.?
A: Not necessarily nor likely. A service manual and certainly a
schematic is not usually a ‘how to’ manual, but will typically be only a
basic, and usually ‘technically written’ ‘guide’ for a trained and
experienced electronics service / bench repair technician to ‘decipher’.
Issue: I am out of inputs on my
receiver / integrated amplifier. The only one available is the ‘Phono’
and I’m not using a turntable, so don’t need it, but I know you can’t
plug anything into that...
A: There are a couple of ways to tackle that. You could purchase an
external ‘Tape Monitor switch / input selector and expand one of the
other inputs. There are many different versions of those out there. The
other option, if you really only need ‘one more’ input is to purchase a
‘Reverse Phono Pre-Amp’. It is a small ‘box’ that you put in between the
‘line level’ device you wish to connect and the phono input. It
attenuates down the ‘line level’ device such as a DVD player or an MP3
player from 100-150 mV to approx 5mV. It also reverses the RIAA
equalization, built into the phono pre-amp. We use them in the shop all
the time to test the ‘phono’ inputs of receivers / pre-amps with CD
players (as it’s not practical to have a turntable on the work bench
typically, and certainly more convenient).
Issue: My old, antique, tube radio hums even after it
warms up...
A: This is usually more of an issue on antique / vintage ‘Tube Type’
radios that are over 40+ years old. It’s generally caused by ‘dried-up’
power supply filter caps (capacitors). Anytime we restore a ‘vintage’ or
antique tube radio or tube amp, it’s a ‘given’ that we will replace the
filter capacitors with fresh parts.
If you don’t know what any of this is referring to, or have never done
‘tube work’, THEN DON’T!!! Most tube electronics operate with voltages
of 300-600 VOLTS!!! Also, capacitors can store a potentially lethal
charge for many years after its’ last use, even if it’s not plugged in,
and even if it hasn’t been plugged in for years! If you’re qualified to
work on ‘tube electronics’, then a great source for replacement
capacitors, tubes, knobs, tuning string, pilot / dial lamps, restoration
books, and most other needed supplies is ‘Antique Electronic Supply’,
www.tubesandmore.com
Issue:
When I connect my "iDevice's" (smart phone,
satellite radio, portable 'whatever') 'headphone output' to my
receiver (amp), the sound has excessive distortion in it...
A: So "excessive" can be in the
"eye of the beholder", but lets assume you mean by 'reasonable
standards'. The "headphone output" is not the best way to connect, but
for many folks and situations, it's probably the 'default' method (hey,
I've done it too in a pinch). If you are going to do that, you need to
realize that "iDevice's" the built-in, headphone amplifier may be
capable of much higher level than typical 'Line Level' devices, thus
you'll want to reduce the volume on the 'iDevice' (you probably had it
fairly high to drive your headphones) to a level that sounds good
without distortion. Be aware that if you lower it too much, you may
introduce 'hiss' (electronic noise that you may or may not notice) thus
lowering your 'signal to noise' ratio. A proper 'docking station' with a
proper line output (typically in the 150mV range) would likely be a
better option (don't use the 'headphone output' on the docking station
as you'll have the same issue).
(revised 2019)
Issue:
North American Voltage
unit being used in Europe / Asia or visa-versa...
Recent email
regarding a unit designed for the North American market, being sold to
someone in Europe:
"My
name's Dim. Music lover, Belgian sound engineer, with a big trouble...I
love your shop and your website, and according to me you simply are the
bests on...I spend hours by reading what you do, and all those crazy old
audio stuffs you've just bring alive! Anyway...The reason I'm contacting
you is simple. I've just bought a great PIONEER TX-9100 tuner, on ebay...Want
to make it working, but when I try to put it on, nothing happens...The
unit is (I guess) an US version, because of its plug (2 flat parts with
holes on it). It is written: 120 volts, 30 watts, AC 60 Hz, with a "FUSE
AC lines 1A-125V" on back panel, and a "AC outlet un-switched 500W max"
output as well...Here in Belgium, we use regular 2 pins European
plugs...I kwew when I bought it that I had to put an adapter at the end
of the plug, to make it compliant on European voltage plugs. That's what
I did, but it wasn't that easy so because the unit doesn't seems to work
at all...No light, no sound, nothing!... Should I change the general US
plug, and put an European one? Should I buy a special chord for the AC
un-switched outled, to make it work in Europe?
Many thanks to you in advance, and if you need additional informations
on my unit, just let me know! Dimitri"
"Hi
Dimitri,
Thanks for visiting oaktreevintage.com.
The TX-9100 'can' be a great tuner, as long as it has a 'clean bill of
health' from a qualified tech.
Having said that, none of that matters if you don't have the correct
power for it, and from what you've told me, you don't. They did make
units that were 'multi-voltage / multi-Hz' but doesn't sound like this
is one of them. The only advice I can offer is that you need to supply
it with 60Hz / 120V AC power / current / voltage. They do make
transformers to convert 220/240 V to 110/120V, but they are generally
designed for use with appliances and not delicate electronics. They do
make them of that quality, but they are expensive. Secondly you need to
address the Hz. Running a 60Hz unit on 50Hz might be ok, or it might
not, or it might be ok for a while, but on a tuner the power supply
circuit is what would be of concern. DO NOT SIMPLY PUT ON AN ADAPTOR
PLUG THAT ONLY ADDRESS 'PIN / PLUG FIT'.
Assuming no damage has been done (yet), don't risk further damage
without a COMPLETE understanding of how to get this unit powered up
safely with the correct transformer designed for 'delicate electronics'
and really the Hz issue should be addressed to, but that can be VERY
EXPENSIVE. Hope that info helps.
Keep checking as we never know from day to day what will arrive. Good
luck and thanks again,
Jerry at www.oaktreevintage.com
ANOTHER OF SIMILAR ISSUE...
"Ciao,
it's Dante from Italy, I need deeply some help, would be kind of You if
could help me with some troubles on my Audiotronics 312T classroom
turntable...
it seems that every speed is going slow....checked the other "twin"
model I have and everything is total the same as the on the other one.
So I would like to know if on the motor there is a "kind" of screw or
something else to regulate speed and pitch....
I would be glad to have
some help and enjoy
the Audiotronics with some records, Thank You in advance, Dante"
"Hi
Dante , Thanks for visiting oaktreevintage.com. All of those
'vintage / older' 'classroom' type phonographs
(including Audiotronics) are 'rim drive'.
Very simple motor
with a 'stepped' capstan
that drives a rubber wheel that gets 'wedged' between the motor capstan
and the inside of the platter rim.
The motor speed is controlled ONLY by the 'HZ' of the AC motor. There is
no "speed control" inside on these types of phonographs.
There are 3 likely causes for those symptoms. If you
do not have a turntable / phonograph designed for European / 50Hz AC
current, then you would need to address that.
There are a few ways to address, but all of them will be either
'expensive' and or difficult to do at best. If that is the case, I would
'start over' and find a unit that is already designed for your AC
current.
If your unit is designed for '50Hz' current, then the
cause is
likely either the motor is 'gummy' and needs to be cleaned and re-lubed
(as well as the 'idler wheel' bushing),
and /
or the rubber drive wheel is hardened
and slick and needs to be re-surfaced or replaced.
Both issues could be causing the speed slowness as well. Hope that
helps. Good luck and thanks again, Jerry"
Issue:
When I 'touch' the face /
knob / case of my stereo receiver / amp / unit, I get a slight
electrical shock or tingle, especially if I touch it with my bare arm...
A: This is usually not much of a problem on more
modern gear (although 'modern' gear generally has many more design /
quality issues than more 'vintage' gear) as the wall plugs on the AC
cord tends to be 'polarized', meaning it will only fit into the wall
outlet 'one way' (one of the spades / terminals on the plug is wider
(the 'neutral' one)). On most older gear, and on gear with 'round' pins
such as European / Asian gear, the plug can be inserted into the wall
outlet either way. Normally this doesn't present any issues, however,
occasionally, either due to original design, or a problem a unit may
have developed, voltage can be present if the plug is 'inverted' (ie,
the 'neutral / skinny' spade is in the 'hot' connector). There are two
ways to approach this. The safest is to have a technician take a look at
the unit to ensure there is not a problem that has developed. The
second, and the technician may default to this either by instructing you
to do it, or by installing a 'polarized' plug, or even going further by
retrofitting a 'grounded / 3-Prong' plug, is to have you simply 'invert'
the plug in the outlet. AGAIN, the safest route is to have the unit
checked for overall safety prior to simply inverting the plug. There
could be an underlying issue, that could be potentially 'fatal' TO THE
USER, aside from the gear.
(revised 2018)
Issue:
"I just purchased a Pioneer RT-909
from a fleeeeeeeeeebay seller. Besides the rollers and the belt what
else would be suggested to change in a “tune-up” of a Pioneer RT-909?
Would you carry replacement plastic legs? Regards, Frank...
A:
Hi Frank,
Thanks for visiting oaktreevintage.com. So the 909 has
proven to be a fairly durable design with not too much to need to
address (other than the belt and rollers of course). The tension arms
tend to get sluggish as does the pinch roller ‘lift mechanism’. One or
both of those need to be addressed currently on about 50% of the units
out there by disassembling, cleaning out old ‘stiff’ lube and re-lubing.
Also as the ‘reel motors’ are “AC” powered, they require ‘start / run’
capacitors to function and we get quite a few calls for replacements as
their 40 years old now (should really be replaced with ‘fresh / new’
ones though and not our 'take-outs'). Probably the biggest (most
expensive and difficult to find) part we get requests for would be the
capstan motor. The spaces between the commutators become filled with
carbon which causes issues with the motor. This can sometimes be cleaned
out and the motor revitalized, but it was never meant to be taken apart,
so is not only tricky, but risky to the motor (but kind of falls under
the heading of, “what have you got to loose”). The parts I get the most
requests for and sell almost instantly would be the ‘spindle tips’, and
the ‘black skids / feet’ as they are often broken in transit / shipping
due to inadequate packing usually by inexperienced fleeeeeeeeeeeeeeebay
sellers that probably shouldn’t be selling reel to reels.
Yes, we have quite a few parts, shown on our ‘Pioneer RT-901/909 Parts’
page.
Here's a direct link to our “Pioneer RT-901/909 Parts’ page that shows
those:
http://www.oaktreevintage.com/Pioneer_RT-909_Parts.htm
and of course we also have the rubber kit;
http://www.oaktreevintage.com/Pioneer_RT-909_Pinch_Rollers.htm
Issue:
Parts no longer available; "I’ve got a
surround sound amp and everything still works on it EXCEPT the motorized
volume control no longer works by remote control (The remotes are good,
yes, there are two) but apparently, the little motor could – can’t do it
anymore. Now the parts outlet for this brand / model
says the part is no longer made and they don’t have an alternative. Any
thoughts on the matter ??" Steve
A:
"Thanks for visiting
www.oaktreevintage.com
. Unfortunately that is a unit we’ve never had come in (yet) to
be parted out. Sorry.
So as far as “thoughts”. Pretty much the only way
you’re going to find parts for units over 7+ years old (almost
regardless of the industry), is you’ll need to get it from another of
like / kind unit. We have to do that all the time. There may be other
models that use the same part, which would be useful to know so that you
can widen the scope of potential donor units in your search. It’s a bit
tedious to figure that info out, but what you have to first do is figure
out what other units from the model year yours was made. A ‘web search’
might give you the info, but that info may or may not be accurate, nor
complete (may have to look at a resource such as “Usedprice.com”, which
is the web site for Orion Blue Book. Historically they try and list all
units, by all mfgs, by years). Then once you have model numbers, start
sourcing / downloading / collecting service manuals for not only your
unit, but the ‘flanking’ models to yours. Then search the service
manuals for part numbers. Again, it’s potentially a ‘LOT’ of leg work,
but typically better you do it than paying a tech ‘shop hourly rate’ to
do it. Sometimes you won’t get anywhere doing all that (for various
reasons), but that’s part of the risk. Once you determine which unit(s)
utilize that same part number, then you can expand your search to those
models. Ultimately you may have to purchase an entire unit simply to get
the part(s) you need. You’ll need to determine if a unit is worth the
above effort / resources which could be based on a multitude of factors.
I hope this helps."
RELATED ISSUE FOR MUSICIANS
Issue:
When I my guitar / bass,
then go up to a microphone, or sit on a 'metal' stool / chair, I get an
electrical shock or tingle, especially on my lips...
A: Puts a whole new meaning to the name 'Hot Lips'...(Yes,
I know, BOO-HISS, but it had to be said).
Anyway, this is usually not a common problem on more modern gear
(although 'modern' gear generally has many more design / quality issues
and problems than more 'vintage' gear) as the wall plugs on the
AC cord tends to be grounded with 3-prong plugs or at
least 'polarized', meaning it will only fit into the wall outlet
'one way' (one of the spades / terminals on the plug is wider (the
'neutral' one)). On most older gear (tube guitar amps, tube PA heads,
etc) and on gear with 'round' pins such as European / Asian gear, the
plug can be inserted into the wall outlet either way.
(I have had this happen MANY times myself). You are holding your bass /
guitar and walk up to a 'metal-screened' microphone, such as the famous
and widespread Shure SM-58, touch your lips to it, and get the s*#t
knocked out of you. Or you're standing on a basement concrete floor,
barefooted (probably a bad idea in the first place...get some shoes),
and either grab your guitar or bass, or a microphone and ditto, electric
shock. This shock can typically have a full 120V (if in North America)
or 220-240 volts if in Europe / Asia. The sever-ness of the shock is
dictated by aspects such as the humidity of the air, floor, your skin
ambient humidity (how sweaty you are), the finish on the mic, how much
'dirt / grime' is coating your guitar strings, etc. This shock can be
potentially very painful. I've not personally heard of anyone getting a
fatal shock this way, but it's probably happened and I'm sure someone
will contact me with a 'story'. Normally this is either due to original
design, or a problem a unit may have developed, voltage can be present
if the plug is 'inverted' (ie, the 'neutral / skinny' spade is in the
'hot' connector). There are three ways to approach this. The safest (and
probably best) is to have a technician take a look at the unit to ensure
there is not a problem that has developed. The second is to check the 'GND'
switch on any related guitar / bass / instrument amps, if applicable. If
it has a 'GND' switch, then flip it to the other position and see if the
shock potential is still there (safest way is with a 'volt meter', which
every musician (involved with electrical related instruments) / roadie /
soundman should own already). Sometimes on older 'tube' guitar amps, the
power switch will have 3-positions (1x Off and 2x On) that allows it to
double as a neutral / hot inversion switch. If so, try the other 'power
switch' position. The third, and the technician may default to this
either by instructing you to do it, or by installing a 'polarized' plug,
or even going further by retrofitting a 'grounded / 3-Prong' plug, is to
have you simply 'invert' the plug in the outlet. AGAIN, the safest route
is to have the unit checked for overall safety prior to simply inverting
the plug. There could be an underlying issue, that could be potentially
'fatal' TO THE USER, aside from the gear.
Issue: The reverb isn't working on
my guitar amplifier...
A: I
recently had a Peavey "Backstage 50" on the bench and the reverb wasn't
working. This was a classic example of checking out the simple stuff
first, however, I didn't do that. Everything worked except the reverb.
All that would happen with the reverb pot was it would increase high
frequencies a bit. First thing I did was pull the reverb tank and check
the impedance of the Input and Output transformer in the reverb tank.
Then checked the cables for continuity. Then did extensive signal
tracing on the circuit board components. Traced the pins of the 4558
chip and didn't see output on it. Changed that out and made no
difference. After studying the schematic extensively, I noticed the foot
switch jack in the design. I glanced at the foot switch and noticed a
lot of 'green dust / corrosion' inside the plastic jack hole. I grabbed
a 1/4 plug and inserted and pulled it a few times, then checked the
reverb function. It worked! Just goes to show you that you should always
make sure there gas in your truck before you pull the engine and
re-build it. (the above could also apply to other effects / channels etc
that are foot switch able).
MORE TO FOLLOW AS TIME ALLOWS......
Due to limited resources we are only able to do restorations / repairs
on OUR OWN inventory
and unable to take OUTSIDE / CUSTOMER repairs.
If you need
work done to your gear,
TRY
SOME OF
THESE RESOURCES
-WARNING:
PLEASE USE CAUTION WITH ANY ELECTRICAL DEVICE.
ANY REPAIR AND / OR
-RESTORATION
SHOULD BE UNDERTAKEN ONLY BY A QUALIFIED TECHNICIAN. THE
TEXT'S BELOW
ARE NOT INSTRUCTIONS FOR DOING YOUR OWN REPAIR AND
ARE NOT
COMPREHENSIVE IN SCOPE.

.JPG)
.JPG)